Sketching scares those who think they «can’t draw». But a sketch isn’t gallery art — it’s a working tool: fast capture of ideas, observations, and shapes. You’re already drawing when you highlight a diagram in your notebook or draw an arrow in a note. This article is about how to do it consciously. And about which books and approaches really help — not in theory, but with specific exercises for your first month.
What sketching is and why it doesn’t require talent
A sketch (Eng. sketch) is a quick pencil or pen draft that captures a form, proportions, or an idea. Unlike an academic drawing, a sketch doesn’t aim for photographic accuracy — it aims for clarity.
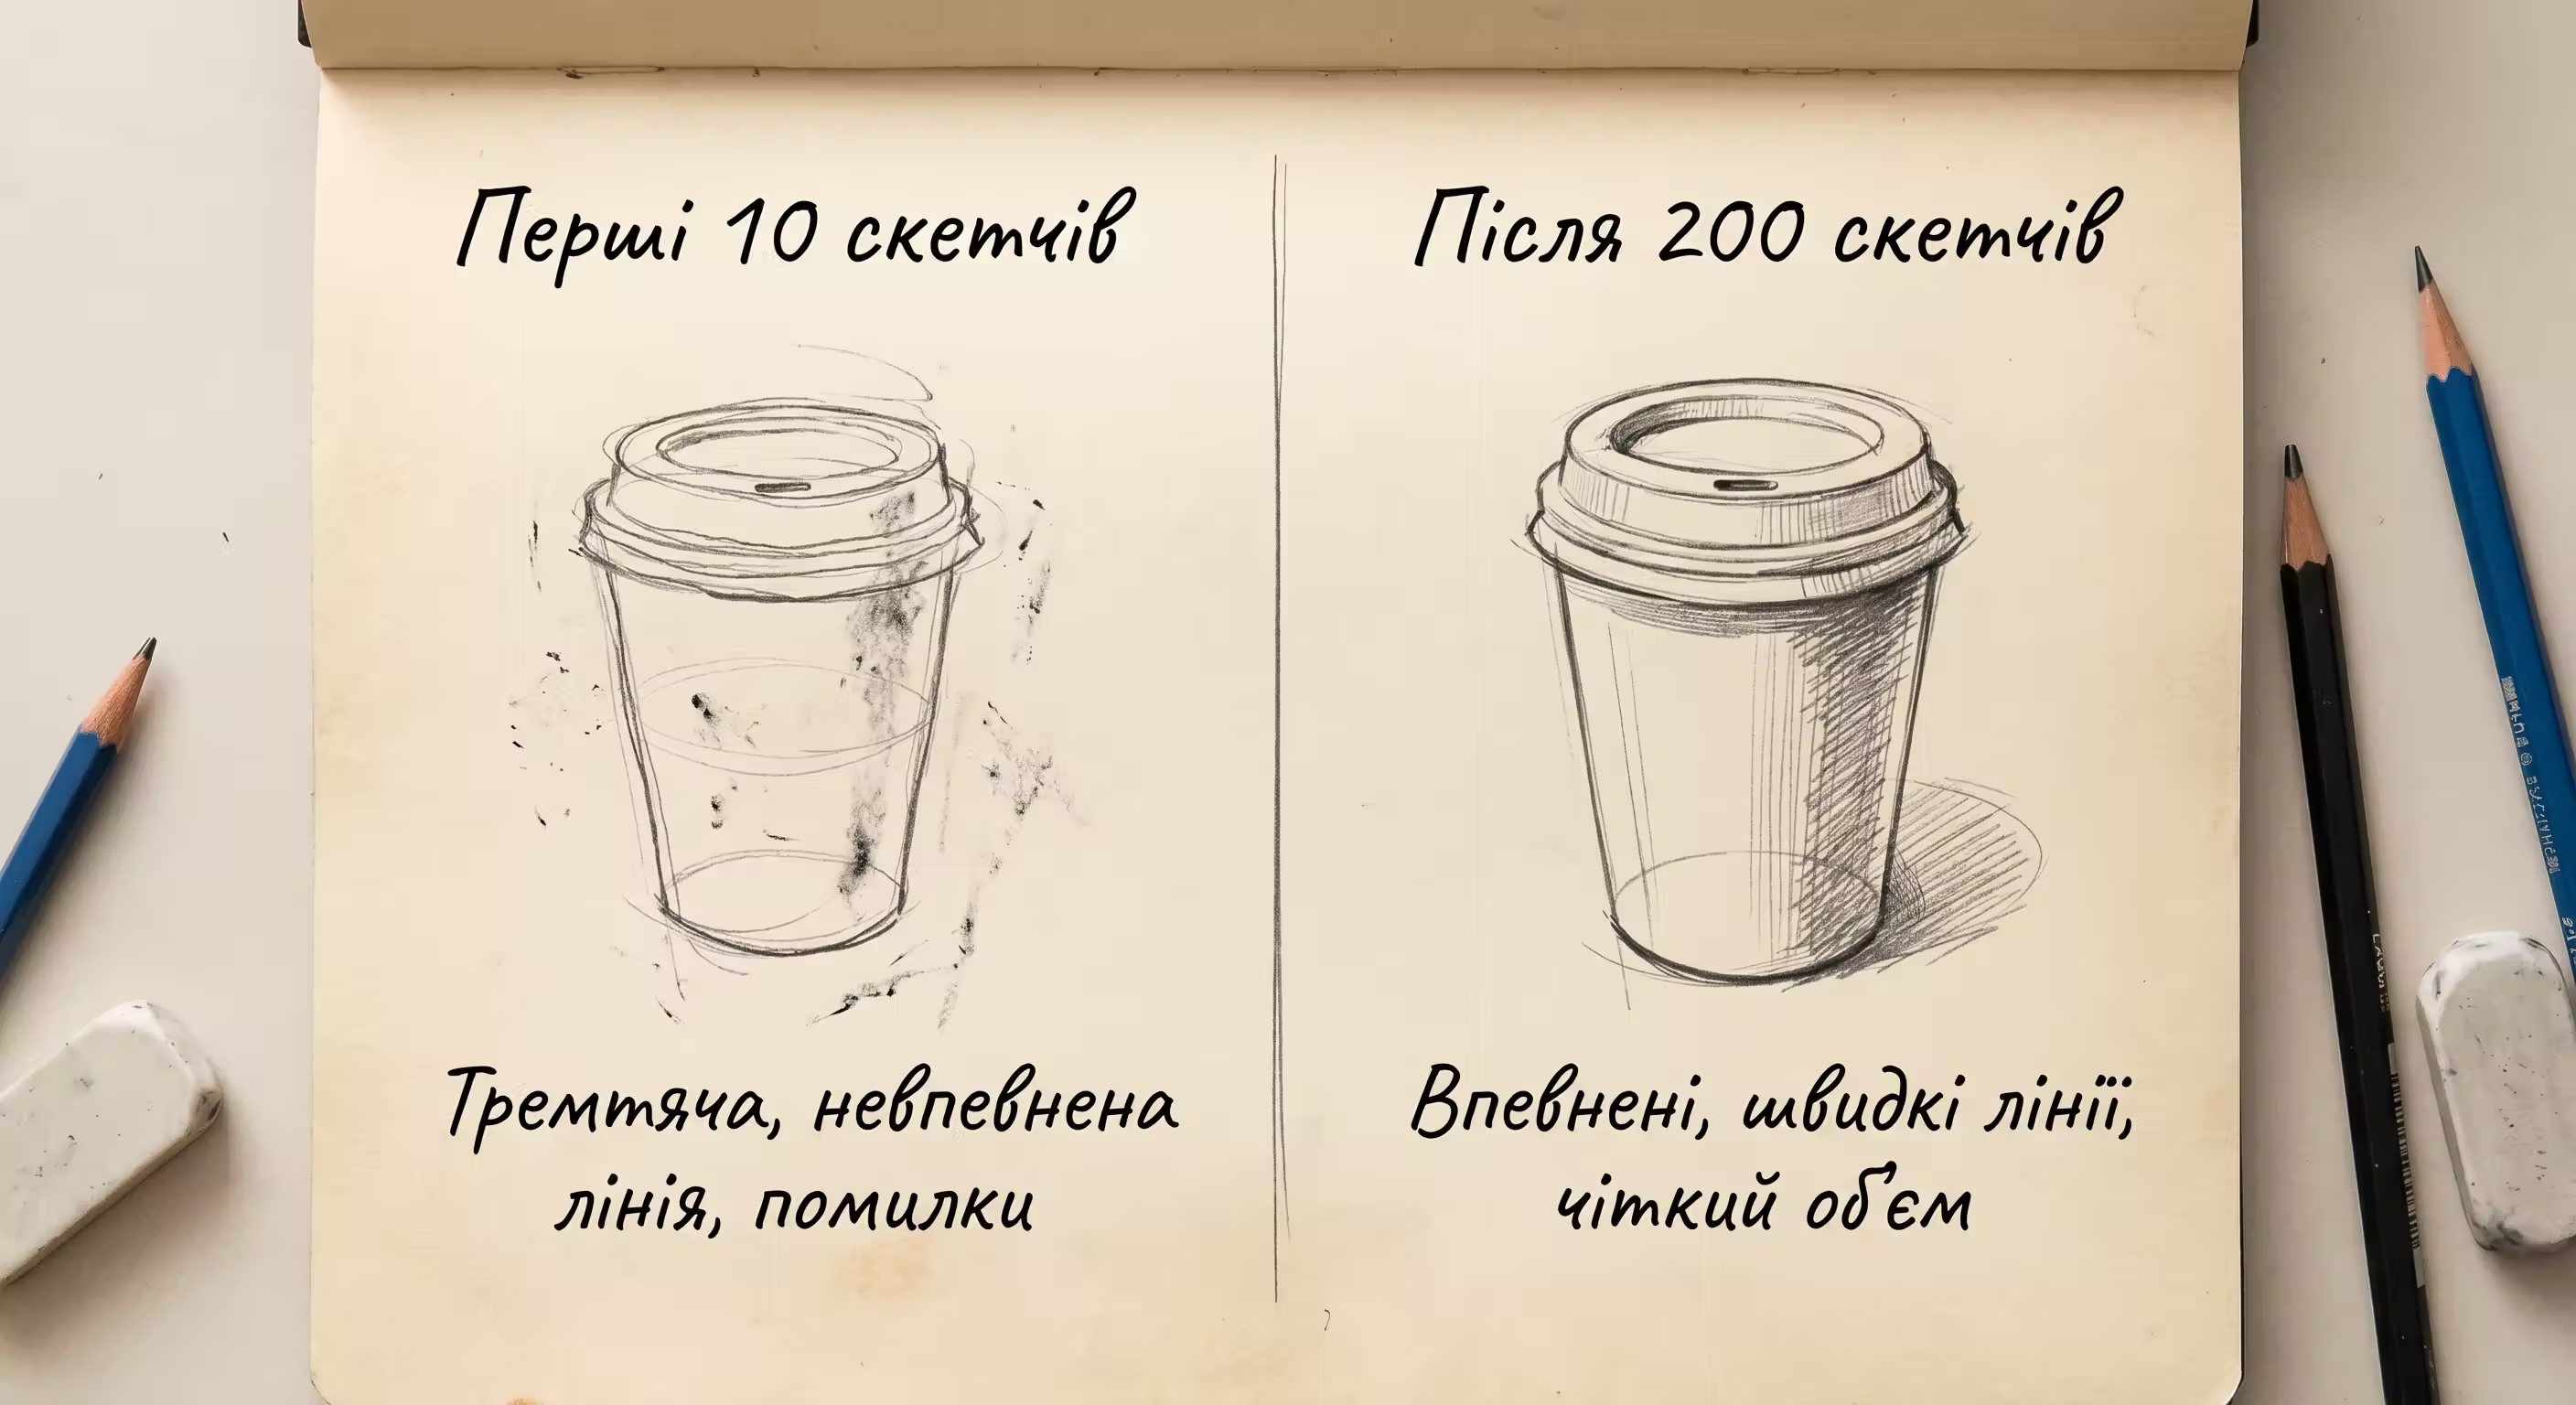
Sketching is a skill, not talent. A musician learns to play scales, not being born with them. The same with the hand: it learns to see and reproduce through repetition. The first 50 sketches will look awkward. The next 50 will be more confident. After 200, you’ll be surprised where these lines were before.
What sets sketching apart from «just drawing»? Speed and purpose. A sketch isn’t for an exhibition — it’s for capturing. An architect sketches a façade on a napkin. A designer draws a button sketch in a notebook. A traveler — a street in Lisbon 10 minutes before the bus. All of that is sketching. And it’s available to anyone willing to practice.
Neuroscientists confirm: drawing activates different parts of the brain than photographing. When you draw an object, you truly study it. That’s why architects who draw buildings by hand notice details a photographer might miss. Sketching is an attention tool.

Where to start: the minimal set for sketching
You don’t need expensive materials. To start, you only need:
- HB or 2B pencil — soft, gives different line thicknesses depending on pressure. You can erase and you can shade.
- Black pen with a fine nib (0.3–0.5 mm) — for final lines or ink sketching right away without a pencil. Micron liners, Staedtler Pigment Liner, or any quality pigment ink pen.
- Sketchbook with unlined paper — with a density of 100 g/m² and up. On thin paper, a pen can bleed through, and a pencil leaves an imprint on the back.
If you want to expand your set after the first month, add 4B and 6B pencils for soft shadows, a white pencil or a gel pen for highlights on dark paper, and a water-based colored marker for easy washes. But starting with all of this is a mistake: too many variables at once.
In «Pen and Ink Drawing», Alphonso Dunn writes this directly: the best way to learn is to have one tool and study it all the way through. One 0.5 mm liner. One sketchbook. A month of practice. Then — conclusions.
More materials aren’t better. The smaller the set, the more often you’ll reach for it.
Basic sketching techniques for beginners
Contour drawing (line drawing)
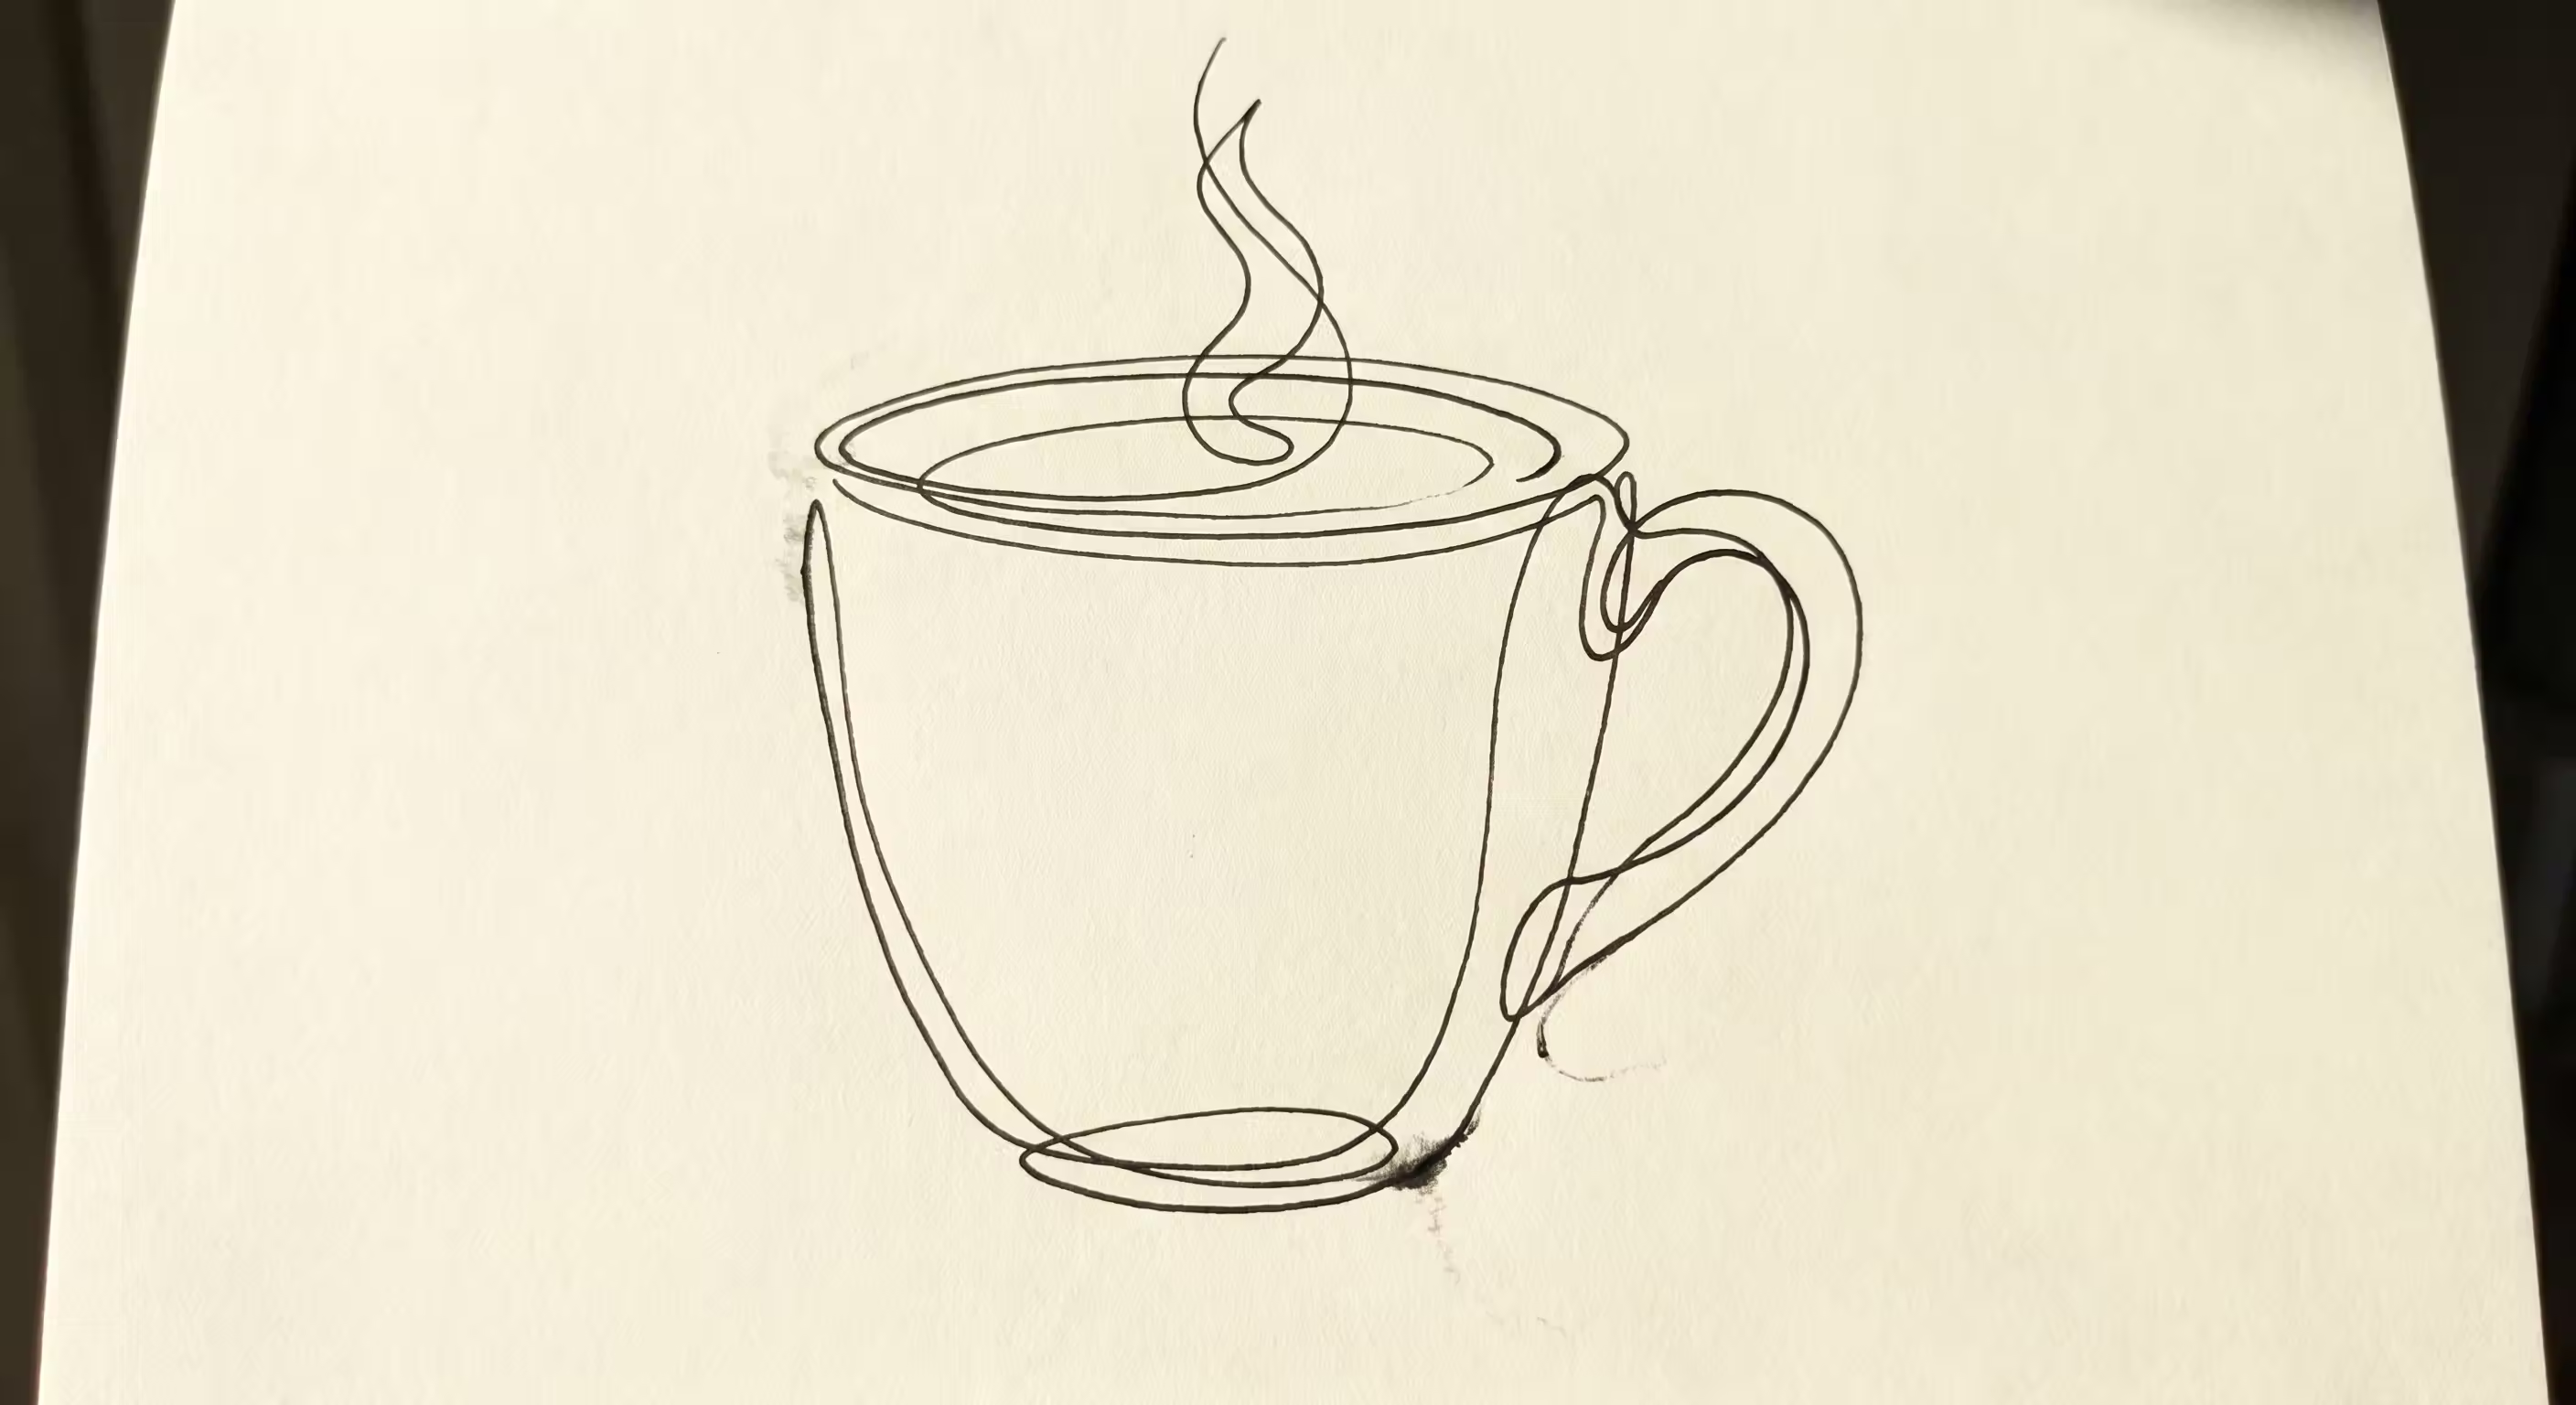
The easiest technique is to draw the contour of an object with one continuous line, without lifting the pen from the paper. It trains your hand to follow your eye and removes unnecessary pauses like «how do I draw this?».
Try this: place a mug or your phone in front of you. Look only at the object, not the paper. Move the line slowly, tracing the contour. The first time will feel strange — and that’s right. The line «floats», proportions get off. But that’s exactly how the «eyes — hand» connection is trained.
After contour drawing from life, try the same object from memory. You’ll see that you remembered far more than you thought. That’s the goal of sketching: not a copy, but understanding the form.
Hatching and shadows
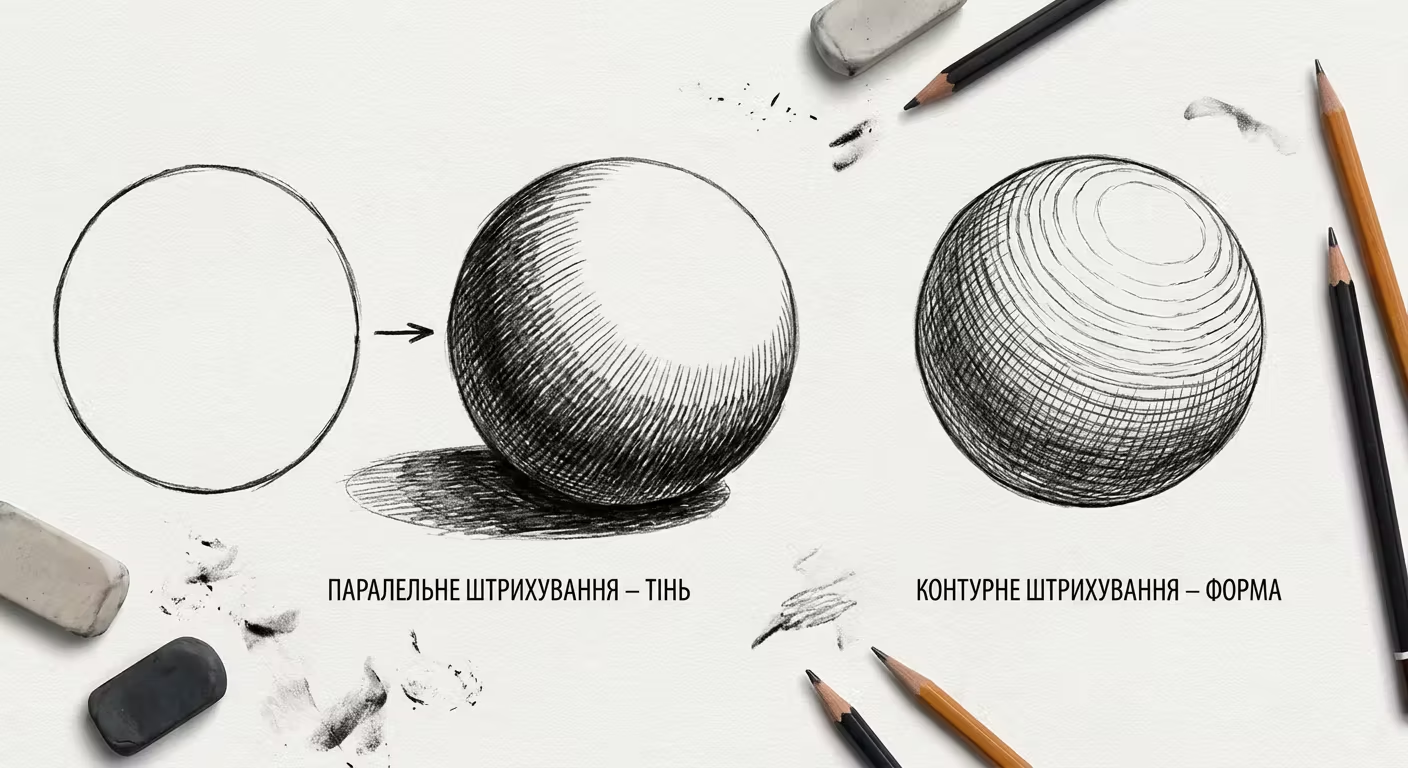
Hatching (hatching) — parallel lines that convey shadow and volume. The closer the lines, the darker it gets. Cross-hatching (cross-hatching) creates even more depth.
Start simple: draw a cube and hatch one face more densely, the other less. You’ll already feel the volume. Then try a cylinder: strokes along the rounded surface will emphasize the shape instead of «coloring it in».
Important: the strokes should be confident, not shaky. If the lines are nervous, slow down. Better five confident strokes than twenty unsure ones.

Sketching from life
Drawing from life is the best training for your eye. Don’t copy photos (photos already simplify reality). Instead, look at a real object or scene and transfer it to paper.
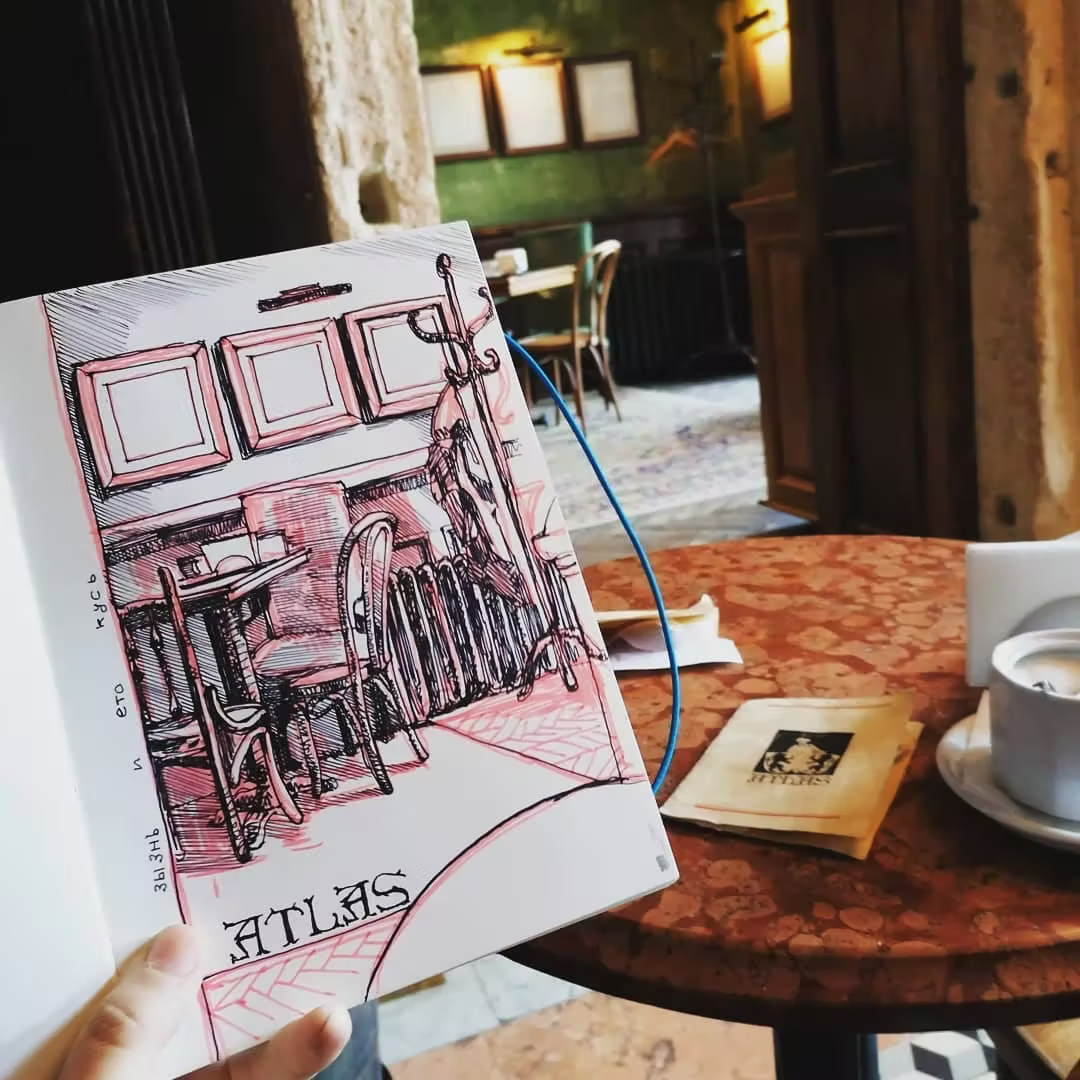
The 5-minute rule: give yourself no more than 5 minutes for each sketch from life. Time limits reduce perfectionism — you draw what matters, not details. Try this: a café, a transit stop, your own hand, a view from the window. Any place is material.
«Putting the hand» — what it means and how to practice it with Alphonso Dunn
«Putting the hand» is a popular phrase, but what does it actually mean? It’s not about «the hand drawing by itself». It’s about the hand doing what the brain commands, without extra trembling, uncertainty, or «sawing» instead of a straight line.
In «Pen and Ink Drawing: A Simple Guide», Alphonso Dunn describes this process in detail. His book may be the best explanation of how a liner or pen works as a tool. Dunn doesn’t teach «how to draw nicely» — he teaches you to understand the tool and control the line.
How to hold a pen for different line types
Dunn describes three main grips:
- Standard writing grip — for details and short lines. The hand rests on the little finger, and the movement comes from the fingers. It gives control but limits the line length.
- «Like a conductor» grip — the pen is held more loosely, and the movement comes from the wrist. For medium lines and smooth curves.
- Suspended grip — the hand doesn’t touch the paper, and the movement comes from the elbow or shoulder. For long confident lines and free strokes. At first it feels uncomfortable, but it’s exactly this grip that gives a «light hand».
Dunn’s tip: for most sketching tasks, it’s enough to master the wrist grip. It provides a balance between control and freedom.
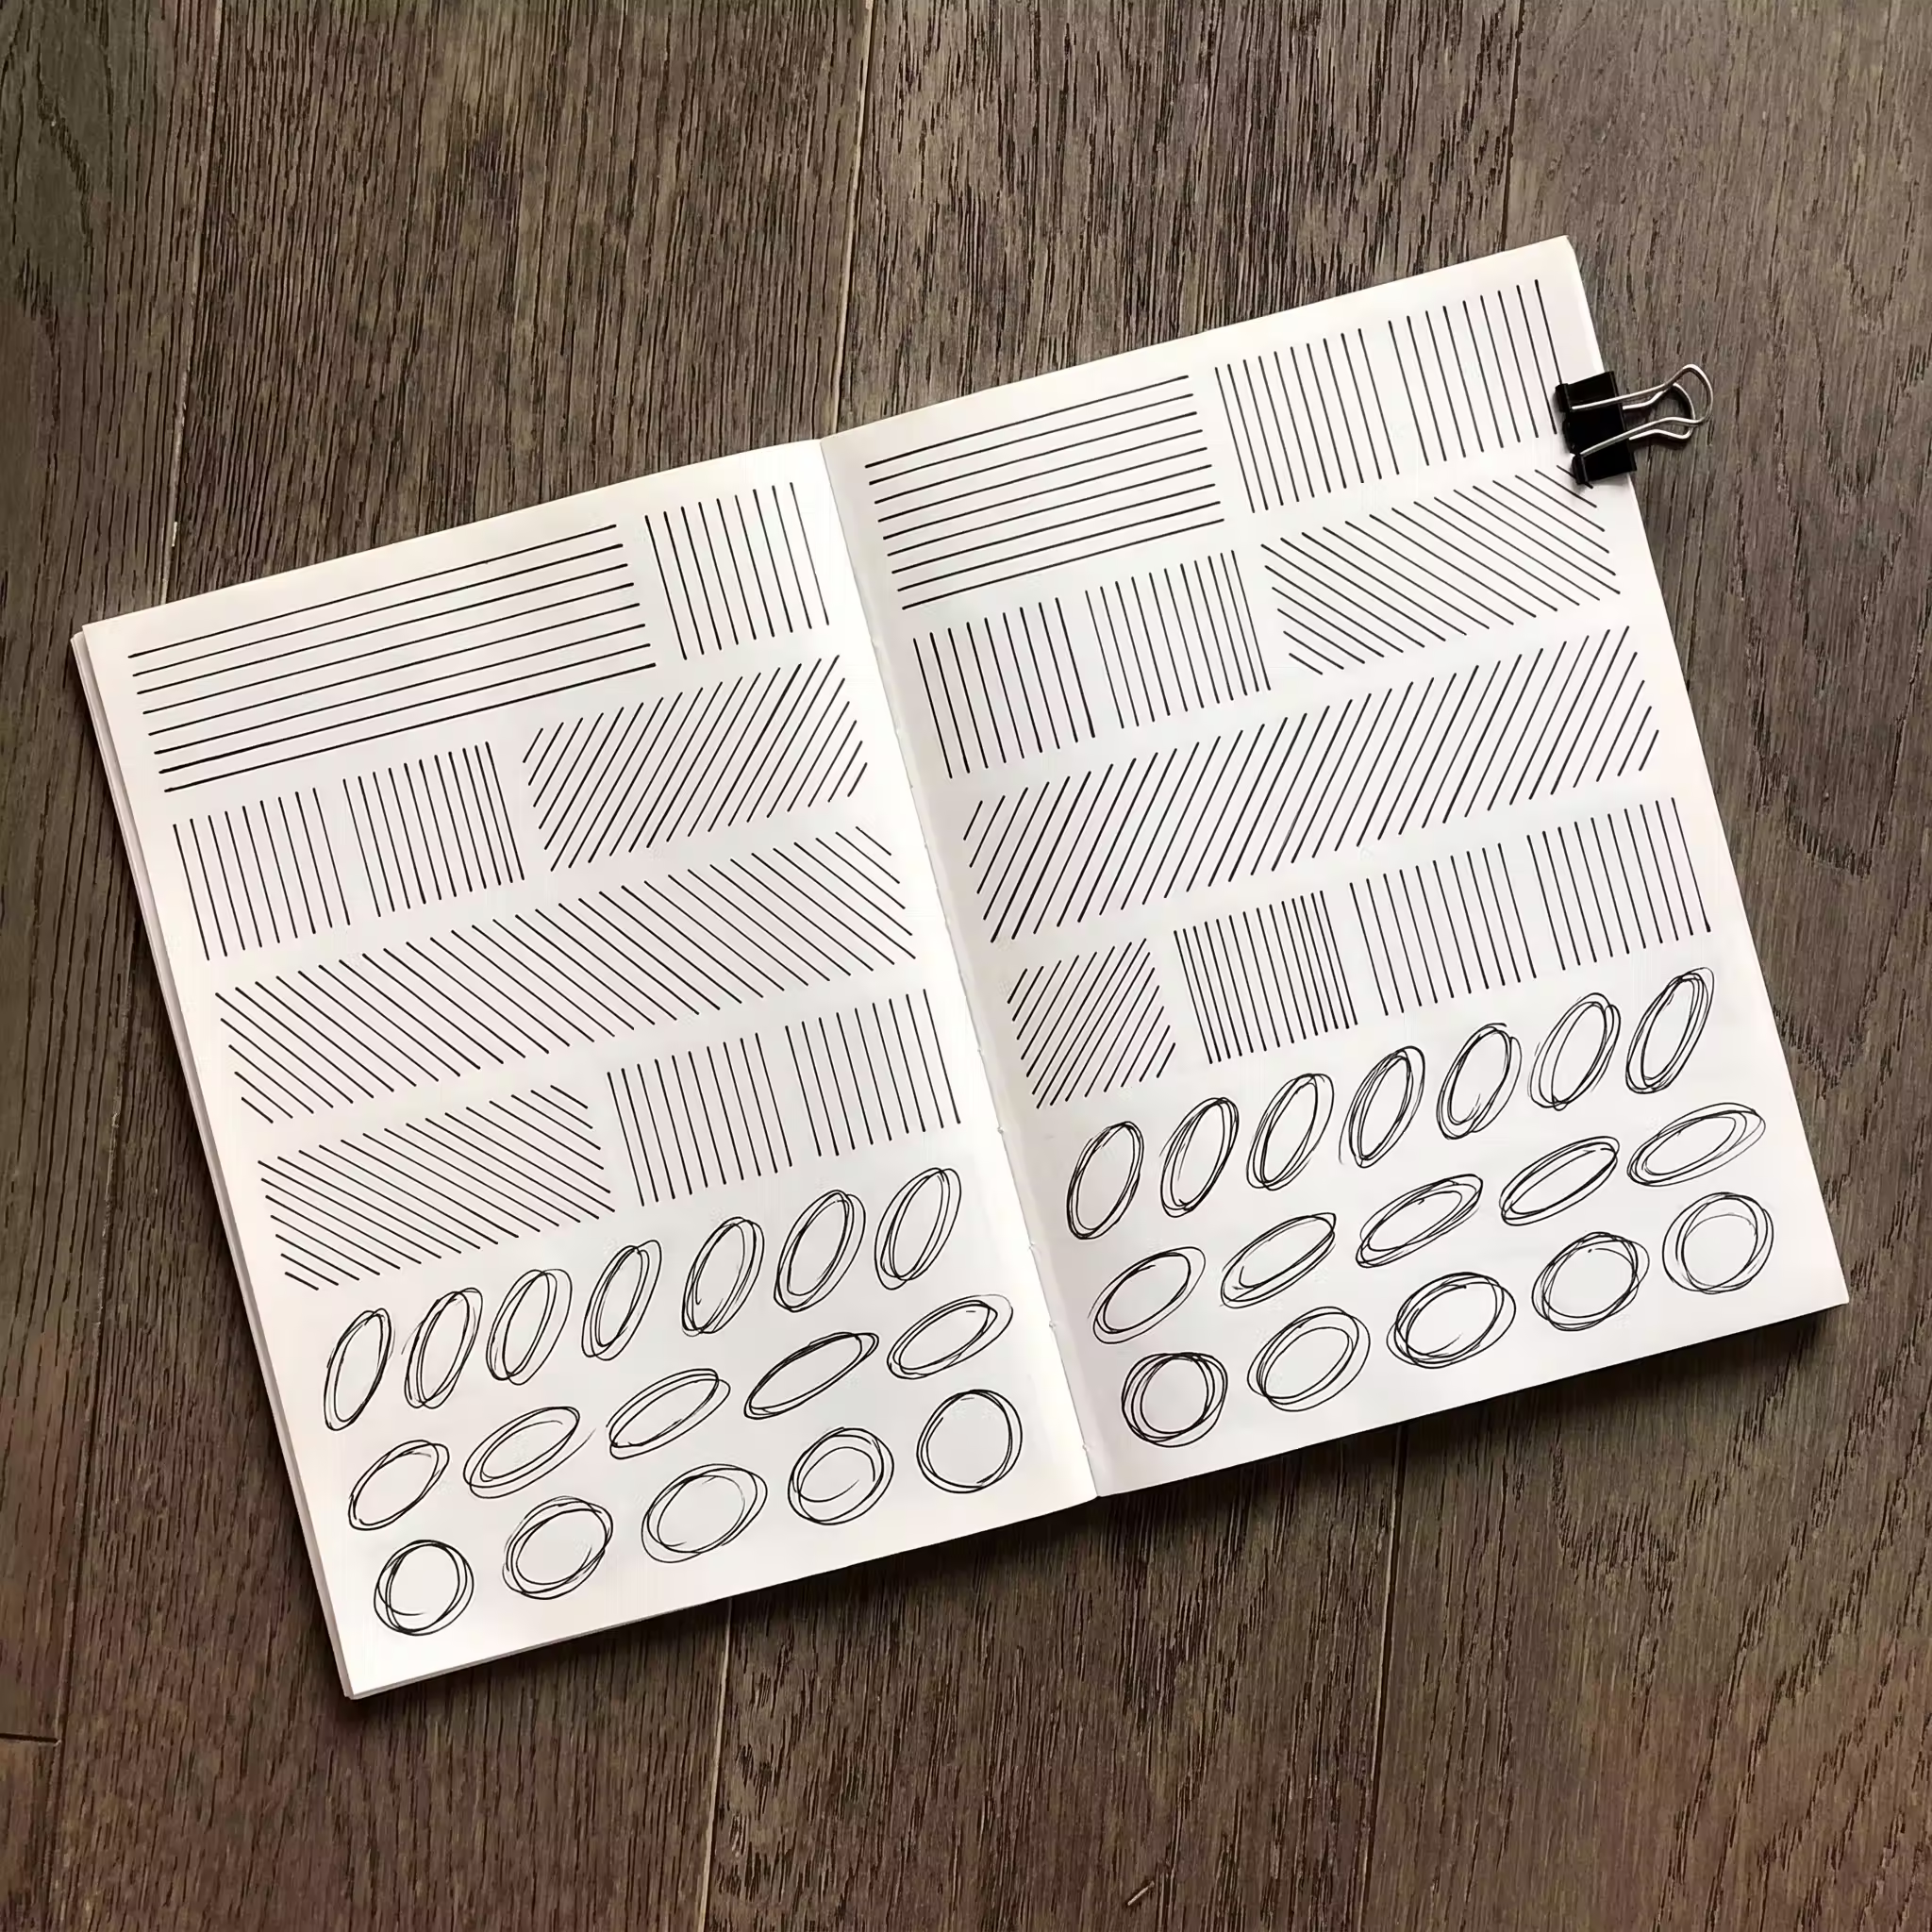
Exercises for straight lines
Dunn starts with the simplest thing: straight lines from point to point. It sounds boring — but it’s the foundation. Your first attempts will be wobbly. After a week of daily practice, you’ll see the difference.
Exercise 1: Draw two dots 5–7 cm apart. Connect them with one confident line — not by slowly «guiding», but by moving from the shoulder, like when signing. Repeat 20–30 times. Then increase the distance.
Exercise 2: Draw horizontal lines in rows, like lines on a ruled notebook. The task is the same spacing between lines and the same line thickness. This trains even pressure.
Exercise 3: Lines at different angles — 45°, 30°, 60°. Your hand needs to learn to move in any direction with the same confidence.
Exercises for circles and ovals
Circles are the hardest for most beginners. Dunn suggests: draw circles quickly, using wrist movement, without stopping. For the first time, draw 10 circles in a row without lifting the pen. Speed helps: a slow circle is always wobblier than a fast one.
After circles — ovals at different angles. An oval tilted at 30° is a cylinder lying down. An oval tilted at 15° is the same cylinder, just slightly differently. Practice drawing the same oval in different orientations.
Why a liner, not a pencil
Dunn argues: a pencil «forgives» — you can erase, make the line weaker, and fix it. A liner doesn’t forgive anything. That’s why it’s more effective for «putting the hand»: each line is a decision. You learn to think before you draw the line, not after.
It doesn’t mean a pencil is bad. But if you want to learn a confident line quickly, get a liner and draw without the right to make mistakes. After a month, your hand will be much more confident even with a pencil.
Hatching according to Dunn
A separate section in Dunn is devoted to types of hatching: parallel, cross, contour (which follows the shape of the object), stippling (dots). For beginners, he recommends starting with parallel hatching at a constant angle — for example, all strokes at 45°. This teaches your hand to move evenly and gives clean shadows.
Try this: draw a sphere with a simple outline. Then shade the shadow part with parallel lines, gradually increasing density toward the darkest area. It takes 10 minutes and gives you more understanding of volume than any theory.
Learning to see: a lesson from Bert Dodson’s «Keys to Drawing»
One of the biggest problems for beginners is that they draw not what they see, but what they «know». A child draws a house: a square + a triangular roof + rectangular windows. These are symbols, not observation. An adult draws an eye: an almond shape + a circle + a dot. Also a symbol. A real ear looks completely different, but the brain inserts the pattern.
In «Keys to Drawing», Bert Dodson called this «symbolic thinking» and built an entire system of exercises to teach you to draw what’s really in front of your eyes — not what «should be there».
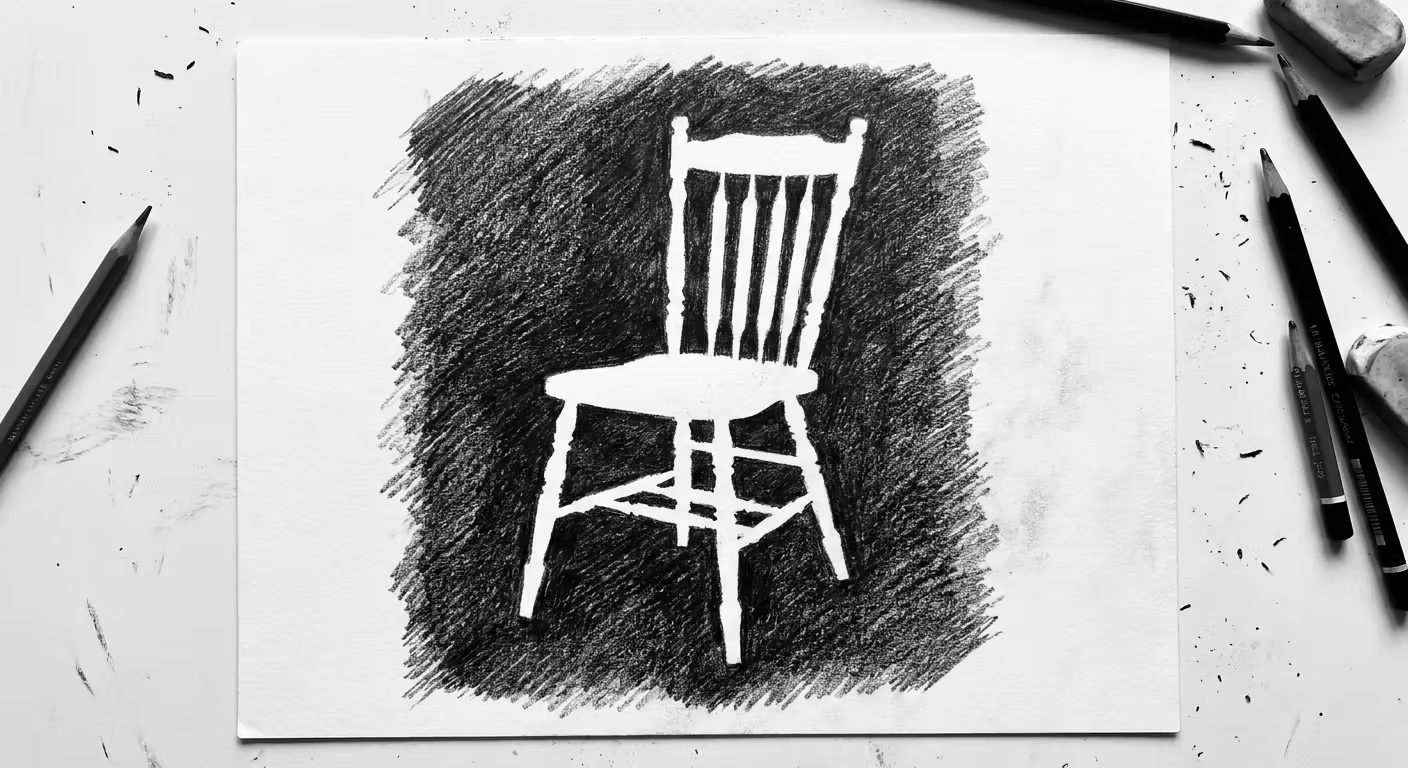
Key idea: draw negative space
Instead of drawing a chair (and substituting the «chair» template), try drawing the space around it — the «holes» between the legs and crossbars. The brain doesn’t have a ready template for the «L-shaped space between the leg and the seat» — and therefore it draws what it actually sees. Result: the chair turns out more accurate than if you’d drawn the chair itself.
Exercise from Dodson: pick any object with «holes» — a chair, a metal stand, a bicycle. Draw only the negative space around it. Don’t draw the object itself — draw the shapes of the emptiness. After 5–10 minutes, look: the object’s outline will reveal itself as if drawn by itself.
Blind contour drawing — draw without looking at the paper
This is an exercise that Dodson recommends for all beginners, and it seems like nonsense until you try it. The rules are simple: place your left hand in front of you. Start drawing its contour, looking only at your hand — not the paper. Move the line slowly, exploring every wrinkle and every bend of the joint. Don’t lift the pen. Don’t look at the paper.
The result will be funny — your hand on paper will look deformed. But that’s not the goal. The goal is to teach your brain to truly «scan» the object, not to draw a template. After 10–15 of these exercises, you’ll notice that your «normal» drawings became more accurate: your eyes learned to actually look.

Draw an inverted image
Another classic exercise from «Keys to Drawing»: take any photo or drawing and flip it upside down. Now copy it. Your brain doesn’t recognize «faces» or «houses» — it sees a set of lines, angles, and shapes. And it draws them more accurately than if the image were in the correct orientation.
Dodson explains: the brain has two processing strategies. «Symbolic» — fast, pattern-based, for recognition. «Analytical» — slow, detailed, for observation. Sketching needs the second one. An inverted image «turns off» the first strategy and forces you to use the second.
Eye and hand coordination: slow contour
Dodson offers the «slow contour» exercise: draw any object, but very slowly — your hand should move at the same speed as your gaze, which traces the contour. Don’t rush. Every stop of the eye is a stop of the hand. Every movement of the eye is a movement of the hand.
This is an exercise for synchronizing. Most beginners draw «from memory»: look — look away — draw. That distorts proportions. Slow contour teaches you to draw «in real time».
Volume in 30 days: Mark Kistler’s system
If Dunn teaches line, and Dodson teaches seeing, then Mark Kistler in «You Can Draw in 30 Days» teaches volume. His book is the simplest approach to 3D drawing that exists. No unnecessary perspective theory: only specific techniques, only practice, one day — one assignment.
Kistler starts with a cube in the first lesson. Not because a cube is easy — but because a cube contains almost all the principles of 3D drawing at once. Once you learn to draw a convincing cube, you already understand: construction lines, overlaps, shadows, and the direction of light.
9 drawing laws by Kistler
Kistler formulates nine principles that create the illusion of 3D on flat paper:
- Foreshortening — objects that «turn toward» you at an angle appear shorter. A hand extended toward you is a circle instead of a rectangle.
- Placement — objects lower on the page are perceived as closer.
- Size — a larger object seems closer.
- Overlapping — an object that overlaps another is perceived as closer. The simplest and most effective depth cue.
- Shading (shadow on the object) — the shadow on the surface shows the form.
- Shadow (cast shadow) — the shadow cast by the object on the surface «anchors» it to the ground.
- Contour lines — lines that repeat the shape of the surface (like lines on a globe) show volume.
- Horizon line — the eye level determines perspective.
- Density (atmospheric perspective) — distant objects are paler and less detailed.
Kistler doesn’t require you to know all nine at once. He introduces them gradually — one or two per «lesson». The first 10 lessons are cubes and spheres. The next 10 are cylinders, buildings, and trees. The last 10 are more complex forms and scenes.
The first exercises by Kistler
Day 1 — cube: Draw a square. From the top-right corner, draw a construction line at 45° up and to the right. From the bottom-right corner — parallel to it. Connect. From the top-left corner — another construction line. Connect it to the top. Shade the side face darker, the top face lighter. Result: a convincing cube in 3 minutes.
Day 2 — sphere: Draw a circle. Add a shadow from the bottom-right (if the light is from the left and top). Leave a small white highlight from the top-left. Draw the cast shadow to the right of the circle (the shape is an ellipse). Result: a ball lying on a surface.
Day 3 — overlapping: Draw three circles of different sizes so that they partially overlap each other. The largest one should be in front. The smallest — in the back. Without any perspective or shadows — there is already depth. That’s overlapping in action.
The simplicity of Kistler’s system is misleading: it actually works. After 30 days of these short exercises (15–20 minutes per day), you’ll draw three-dimensional shapes confidently — the kind you previously only saw as flat outlines.
An expanded list of beginner mistakes — and how to avoid them
- «I’ll draw when it gets better» — it will get better only when you draw. Start with awkward sketches.
- Over-erasing — every erase interrupts the flow. Try drawing with a pen — it teaches you to think one step ahead with your lines.
- Waiting for inspiration — open your sketchbook and draw what’s in front of you. Inspiration comes during the process, not before it.
- Comparing with other people’s work — compare only with yourself from a week ago.
- A pricey «for motivation» set — don’t buy expensive materials as a motivation booster. Buy them as a reward after 30 regular sketches.
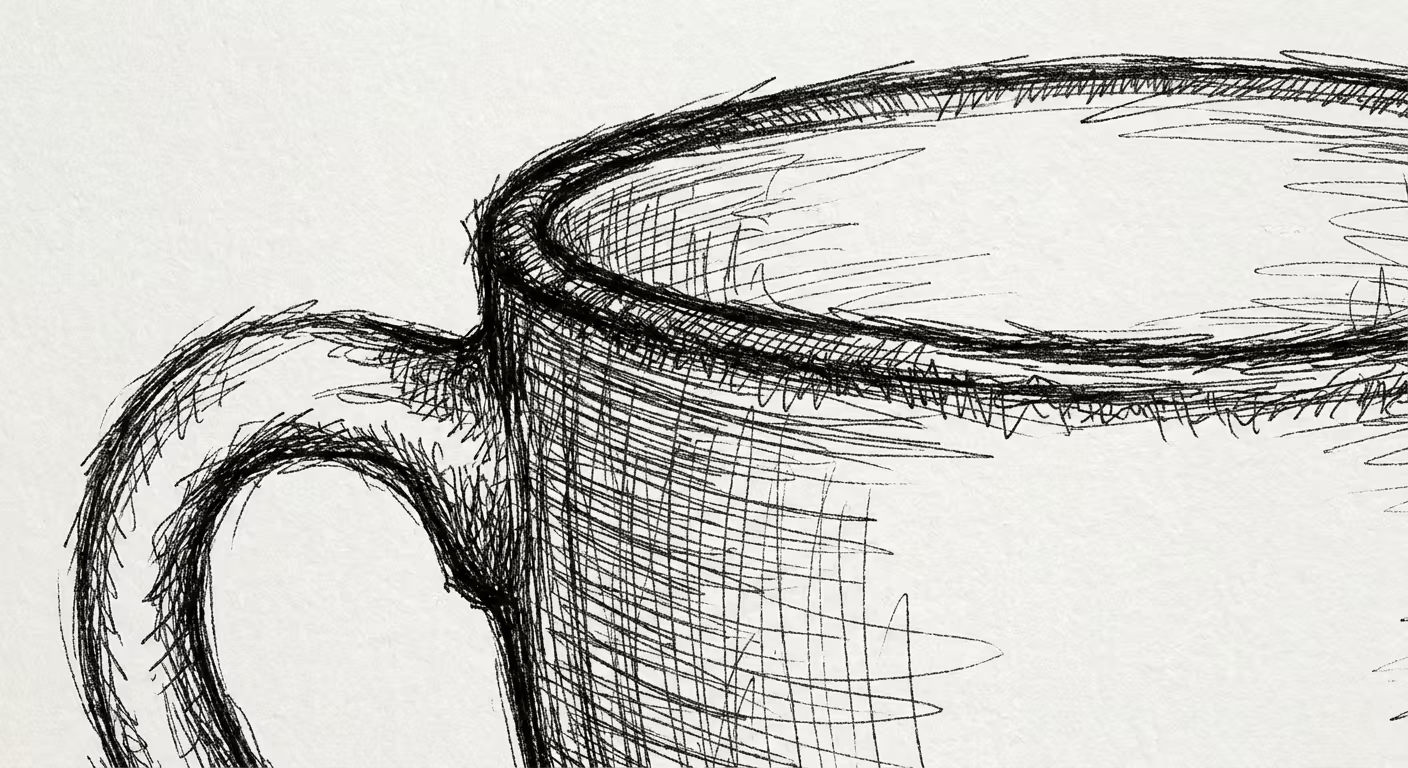
- Drawing only «pretty» — draw boring things: a cup, shoes, your own hand. These are better teachers than a «pretty» landscape.
- Skipping line exercises (a mistake related to Dunn) — many people want to immediately draw «objects». But without straight lines and confident circles, all drawings will be nervous. 10 minutes of lines before drawing is like a warm-up before training.
- Drawing only from photos (a mistake related to Dodson) — the photo already «solved» perspective, lighting, and framing for you. Draw from life at least once a week — it trains other skills.
- Being afraid of 3D forms (a mistake related to Kistler) — many people draw «flat» for years because they think volume is difficult. In reality, three Kistler techniques (overlapping + shadow + construction lines) give 80% of the volume effect.

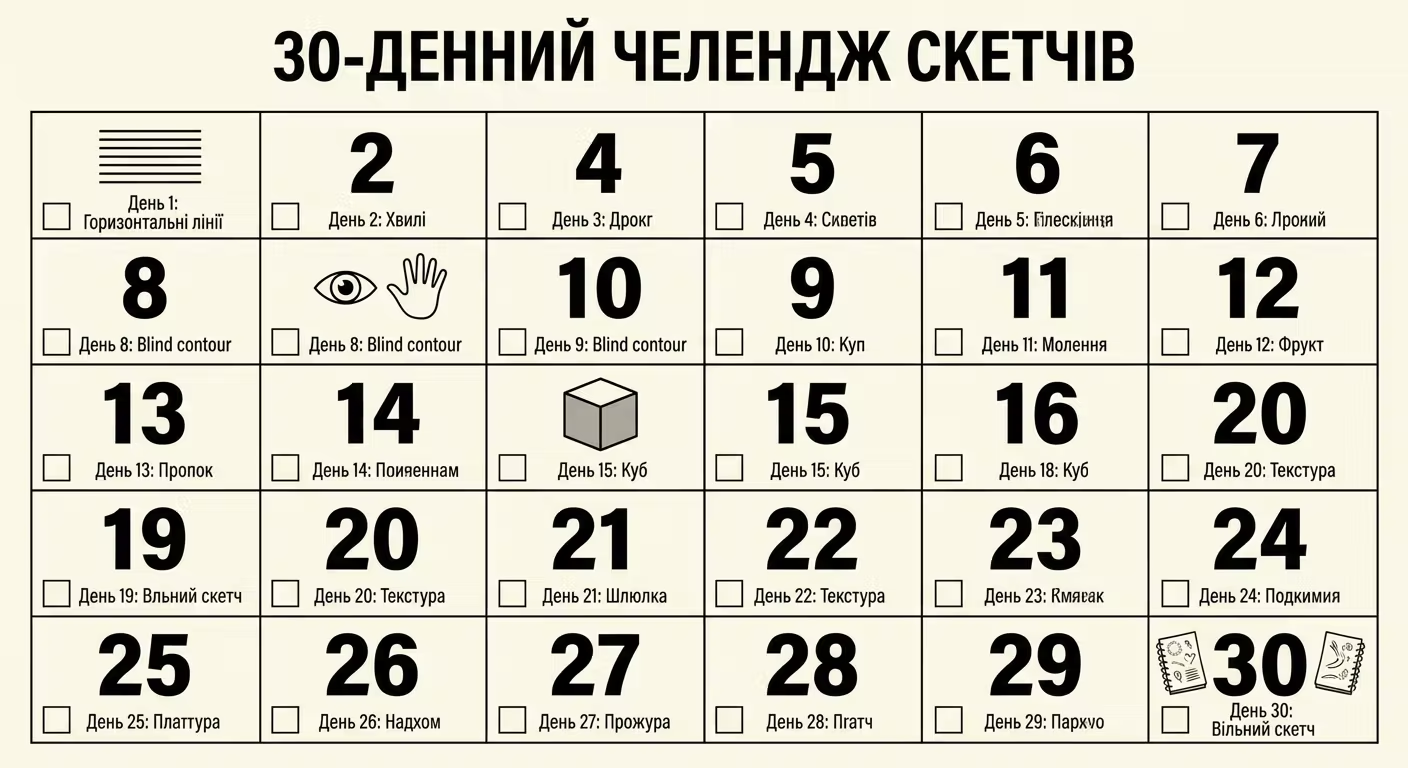
A practical plan for the first month
This plan is designed for 15 minutes a day. No more — better a little less, but every day.
Week 1 — lines and hatching (by Alphonso Dunn)
Goal: teach your hand to move confidently, without trembling and «sawing».
- Day 1: Straight horizontal lines in rows. 3 rows of 20 lines. The goal is even spacing between lines.
- Day 2: Straight vertical and diagonal lines. Same thing, but at different angles.
- Day 3: Circles and ovals. 3 series of 10 circles — quickly, from the wrist, without stopping.
- Day 4: Parallel hatching. Draw a rectangle and fill it with parallel lines — from light to dark, changing the density.
- Day 5: Cross-hatching. The same rectangle, but with two layers of lines at different angles.
- Day 6: Draw a ball with a shadow (lines and hatching only, no fill).
- Day 7: Free day — draw any simple object from life with a liner, without corrections.
Week 2 — learn to see (by Bert Dodson)
Goal: get rid of «symbolic drawing» and learn to draw what you see.
- Day 8: Blind contour drawing. Draw your left hand without looking at the paper. 5 times in a row.
- Day 9: Drawing negative space. Choose an object with «holes» and draw only the space around it.
- Day 10: Inverted image. Take any black-and-white photo, flip it, and copy it.
- Day 11: Slow contour. Draw a cup or shoes very slowly — your hand follows your gaze in real time.
- Day 12: Drawing shadows and forms, not outlines. Draw the object using only shadows, without contour lines.
- Day 13: A 5-minute from-life sketch. Any scene in front of you.
- Day 14: Free day. Repeat the most difficult exercise of the week.
Week 3 — volume and space (by Mark Kistler)
Goal: learn to convey three-dimensionality with simple techniques.
- Day 15: A cube using Kistler’s method. Draw 10 cubes from different angles — from above, below, and the side.
- Day 16: A sphere with a cast shadow. Draw 5 spheres on a surface.
- Day 17: Overlapping. Draw 5 groups of three objects that overlap each other.
- Day 18: Cylinder. Draw a glass or a bottle as a simplified cylinder with an oval base.
- Day 19: Combine techniques: draw a scene with three different-size objects with shadows and overlaps.
- Day 20: Sketch a real object from life using Kistler’s techniques.
- Day 21: Free day. Draw what you want — with everything you’ve learned.
Week 4 — comprehensive practice
Goal: combine all skills into one sketch.
- Day 22–24: One sketch from life every day (5–10 minutes). Focus: confident lines (Dunn) + observation (Dodson) + volume (Kistler).
- Day 25–27: «Themed» sketches: a café, a park, your own desk. Try to capture the scene in 5 minutes.
- Day 28–30: Compare your first sketch of the month and your last one. Write down what improved. Decide what you want to develop next.
This plan isn’t perfect — and it doesn’t have to be. Did you miss a day? No big deal. Continue with the next one. The main thing isn’t «30 days in a row», it’s «30 sessions over 6 weeks».
Which sketchbook to choose for sketching
Paper in a sketchbook isn’t a secondary detail. It determines how the pencil lays down, how ink behaves, and whether graphite smudges.
What to pay attention to:
- Density from 120 g/m² — handles light watercolor washes and ink without wrinkling.
- Clean sheet (no lines) — a ruler and grid limit sketching. A clean page gives freedom in format and scale.
- Hard cover — so you can draw on the go without a backing board.
- A5 or A6 format — easy to carry, enough space for details.
We have sketchbooks made specifically for sketching — with dense unlined paper and a hard cover.
Frequently Asked Questions
What material to start sketching with — a pencil or a pen?
A pencil — if it’s important for you to have the option to correct. A pen — if you want to learn a confident line faster. Both options are correct. Many people start with a pencil, then go over it with a pen and get a cleaner result.
How much time do I need to draw every day to learn?
10–15 minutes a day is more effective than 2 hours once a week. Your hand’s muscle memory is built through consistency. Even one small sketch before bed is progress.
Can I practice sketching without lessons and art education?
Yes. Most sketchers are self-taught. Look at other sketchers (Instagram, Pinterest), copy techniques you like, draw what surrounds you. Education speeds up progress, but it isn’t a requirement.
What’s the best sketchbook for beginners?
Unlined paper with 120–160 g/m² density, A5 format, hard cover. Such a sketchbook is convenient to carry, it holds its shape without a table, and the paper can handle any tool.
Which drawing book should I choose first?
It depends on your goal. For «putting the hand» and working with a liner — Alphonso Dunn’s «Pen and Ink Drawing». To learn to see and draw from life — Bert Dodson’s «Keys to Drawing». For volume and 3D forms — Mark Kistler’s «You Can Draw in 30 Days». Ideally, read them in sequence or alongside the practical plan described in this article.
What should I do if my drawings turn out «not pretty» and I want to quit?
This is a normal stage — everyone goes through it. The first 50 sketches are the «entry fee». Don’t compare your week 1 work to the work of sketchers who have been drawing for 5 years. Compare only with yourself from a week ago. And never throw away old sketchbooks — in a year you’ll look at them with pride.
Sketching is about practice, not results. The worst sketch you draw today is more valuable than the perfect one that exists only in your imagination. Open your notebook, grab a pen, and draw what’s in front of you — a cup, a keyboard, your own hand. That’s where sketching starts. Dunn, Dodson, and Kistler’s books will help when you want to grow further — but the first step is always the same: to start.