Anatomy is one of those words that frighten even experienced sketchers. Someone heard it once and felt “not prepared enough” for it. Someone opened Gray’s textbook, saw the Latin names of muscles, and closed the page forever. But the truth is different: the body is not an exam and not a set of rules. The body is space, shape, movement, light, and gravity. And drawing the body means learning to see.
This long read is not about medicine. It’s about how an artist can find their way into anatomy: through construction, proportions, gesture, and living practice. We’ll move from basic principles to specific techniques — and you’ll come away with a clear plan for what to do tonight with your sketchbook in hand.
Why an Artist Needs Anatomy
Anatomy doesn’t teach you to draw more beautifully. It teaches you to see more precisely. When you know that beneath the surface of the lower leg runs a muscular band — you’re not just “aware of a fact.” You see it. You see how the skin tightens when the arm is raised, how the shoulder unfolds when the body turns, and how the body maintains balance during movement. And because of that, it becomes obvious that the human figure isn’t arbitrary.
Mistakes in poses are often about a lack of anatomical knowledge. A slanted body, an out-of-proportion pose, flat-looking limbs — all of that usually comes from not understanding the body’s structure. Anatomy doesn’t make your drawing harsher — it makes it alive.
Another argument: anatomy frees you from photography. If you know how the body is put together, you can draw a person from imagination, in any pose, from any angle. It’s not magic; it’s a tool. That’s why almost all great illustrators, from Michelangelo to modern concept artists, spent years studying anatomy.
And finally: anatomy gives you a language. A body language that your sketchbook answers. One page, one pose, one observation — and then the next.
The body as a constructor: Michael Hampton’s “mannequinization” method
In his book “Figure Drawing: Design and Invention,” Michael Hampton proposes an approach that changes the way you think about the body. Instead of drawing a “person,” you draw a set of simple geometric objects — and this becomes the foundation on which it’s easy to add details, pen hatching, muscles, and clothing.
Hampton calls this method mannequinization — “mannequinization.” The idea is simple: turn each part of the body into the closest geometric form.
What it looks like in practice
- Head — an egg. Not a circle, but an egg: wider at the top, narrowing down to the chin. Slightly flattened on the sides.
- Torso — a box (box). The ribcage is a large, solid block tilted backward. The pelvis is a smaller block tilted forward. Between them is a flexible connection (the waist) that lets the torso twist.
- Arms — cylinders. The upper arm is one cylinder, the forearm is another, thinner one. At the wrist there’s a small wedge.
- Legs — also cylinders, but with a taper shape: the thigh is wider, the shin narrower. The knee is a little ball-sphere between them.
- Foot — a wedge with an anchor block of the heel.
Hampton’s main idea: first the form, then the details. If your mannequin stands correctly in space, you can overlay any number of anatomical details. But if the mannequin is “broken” (incorrect weight, twisted torso) — no details will save the drawing.
Especially valuable in Hampton is his approach to how the torso joins together. The ribcage and pelvis are never parallel: if one side of the ribcage is raised, the opposite side of the pelvis compensates. This is called contrapposto, and it’s this dynamic that makes the figure alive.
Practical task: 10 geometry poses
Open Line of Action or simply sit in front of a mirror. Draw 10 poses using exclusively geometric shapes: an egg for the head, two blocks for the torso, cylinders for the limbs. No details — just structure. Time per pose: 2–3 minutes.
The goal of this exercise isn’t a “pretty drawing,” but a feeling: where is the weight located? How is the torso tilted? How is the load distributed between the legs? When you can feel it through the form, not the contour, you’ve taken a big step forward.
Body proportions using the Loomis method
If Hampton gives you construction, then Andrew Loomis in “Figure Drawing for All It’s Worth” gives you a measure. It’s one of the most important books on body proportions, written in 1943 and still relevant to any artist.
Loomis’s main idea is the 8-head figure, or “eight-head canon.” An ideal adult person is 8 heads tall. It’s not a standard real-body measurement (most people are 7–7.5 heads), but it’s an idealized canon convenient for illustration and sketching because it gives a sense of harmony and elegance.
How to use the “head module”
Loomis offers a simple method: draw a vertical axis and divide it into 8 equal segments — each segment is the height of the head. Then place the key points of the body:
- 0–1: head
- 1–2: neck and ribcage (roughly to the nipple)
- 2–3: abdomen and navel
- 3–4: pelvis, groin
- 4–5: upper thigh
- 5–6: knee and upper shin
- 6–7: lower shin
- 7–8: ankle and foot
Besides that, Loomis gives several important landmarks: the shoulders are approximately at the level of 1.5 heads (shoulder width is about 2 heads). The navel is exactly at the 3 mark. The elbow of a lowered arm is at navel level. The wrist is at groin level. The fingertips reach roughly the middle of the thigh.
These proportions seem simple — but they save you from the most common mistakes. A short thigh, a long forearm, a large head on a small body — all of this can be fixed if you check your “head module” before you start adding details.
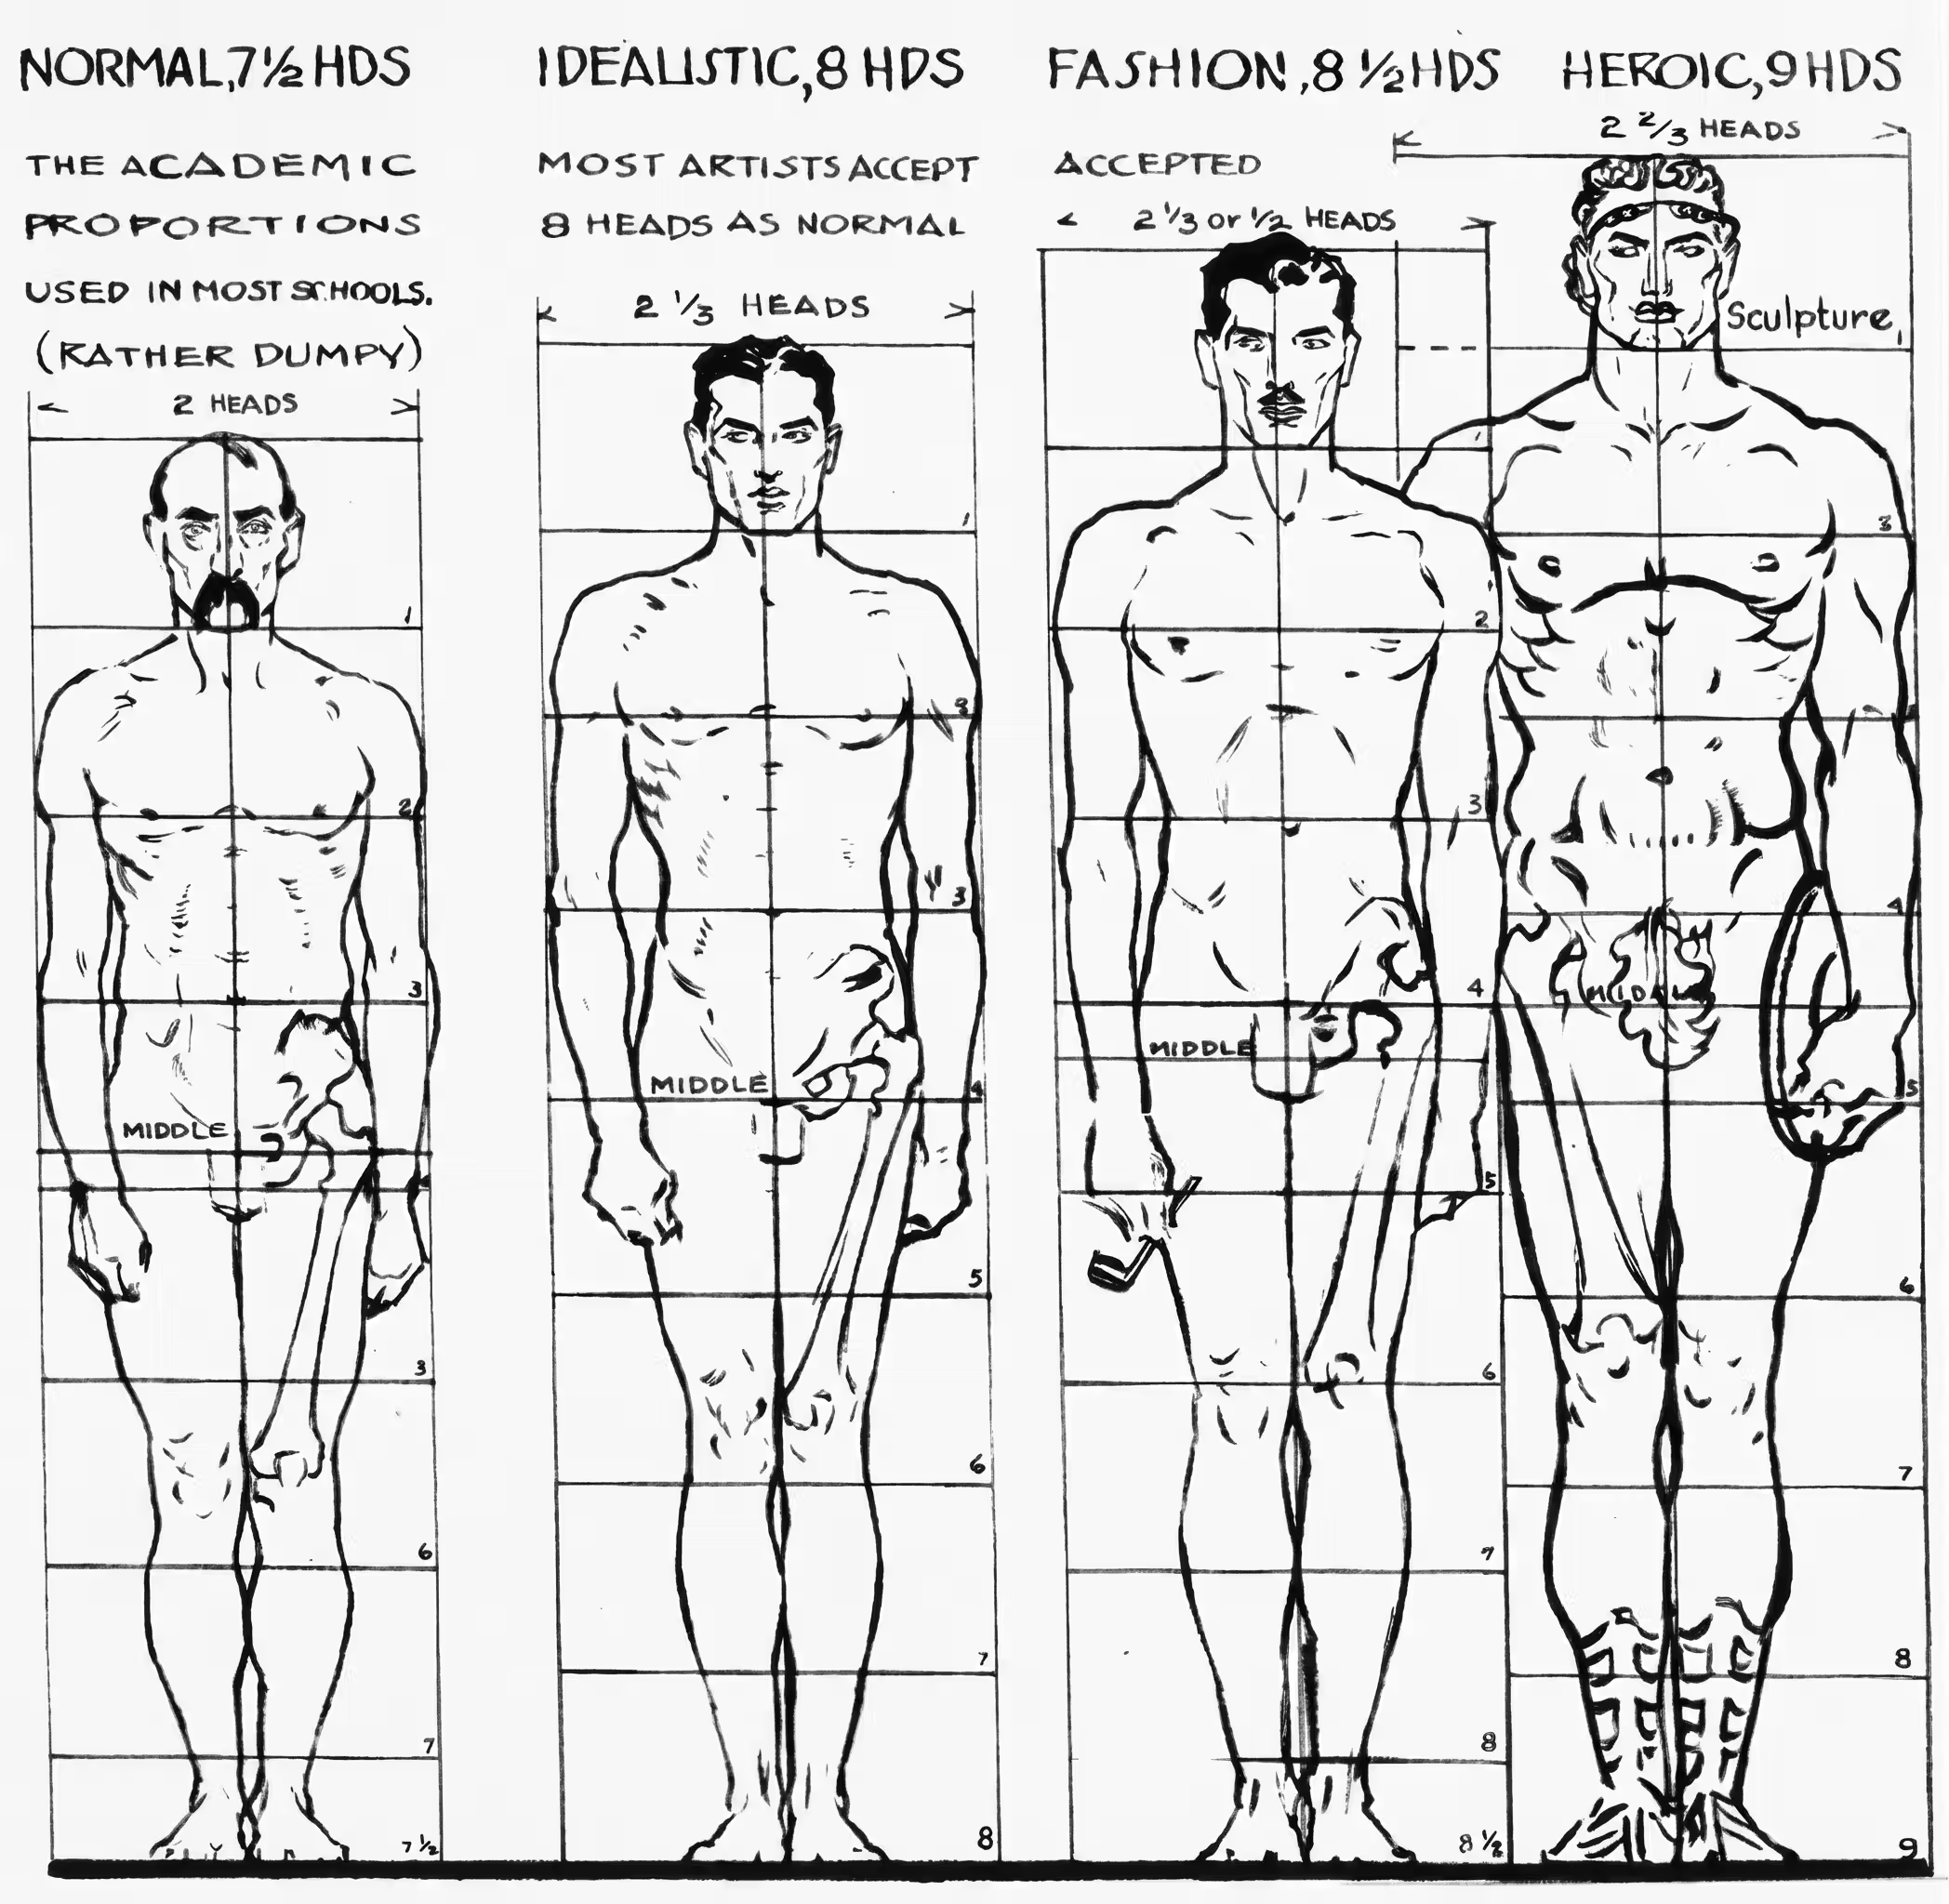
Why the body looks harmonious
Loomis explains it through the idea of “visual rhythm”: a body that roughly follows the 8-head canon automatically looks balanced, because our brain has been evolutionarily tuned to read these proportions as “normal.” Deviations from the canon — deliberate exaggerations (as in comics or manga) — always look like a style rather than an error. But only if the artist knows the basic proportions and consciously departs from them.
Practical task: draw your own scheme
Draw a vertical line in your sketchbook and divide it into 8 segments. Label the key points with words: head, shoulders, navel, groin, knee, ankle. Then draw a simple schematic figure next to it, using these marks as your guide. No details — just the silhouette. Do this three times in a row: front view, ¾ view, and side view. It takes 15 minutes and gives you a solid foundation for years to come.
Where to start: proportions as the first step
You don’t have to start with muscles and the process of digestion. A good understanding of body proportions and how different parts are connected is quite enough.
Body proportions is the first thing you should master. The average adult is about 7–8 heads tall — but that’s just an average value. The head makes up about 1/8 of the total height; the shoulders line up around the elbow level; the navel is at the middle height of the body. This knowledge doesn’t limit you — it frees you. When you know that the legs are roughly the same length as from the thigh to the top of the head, you check the proportions yourself before you begin drawing.
It’s important to understand this: proportions aren’t a cage. They’re a starting point. Michelangelo drew figures with 9–10 heads — for monumentality. Caricaturists make heads 3–4 heads tall from the body height — for comedic effect. But in both cases, the artist starts from knowledge of the “norm.”
Start with what’s close to you: you can draw your own hands and legs, or reflections in a mirror. You can observe people on public transport, in cafés, and on the street. The main thing isn’t to try to draw “correctly the first time.” The main thing is to look carefully and draw often.
Joints and nodes: the mechanics of the body
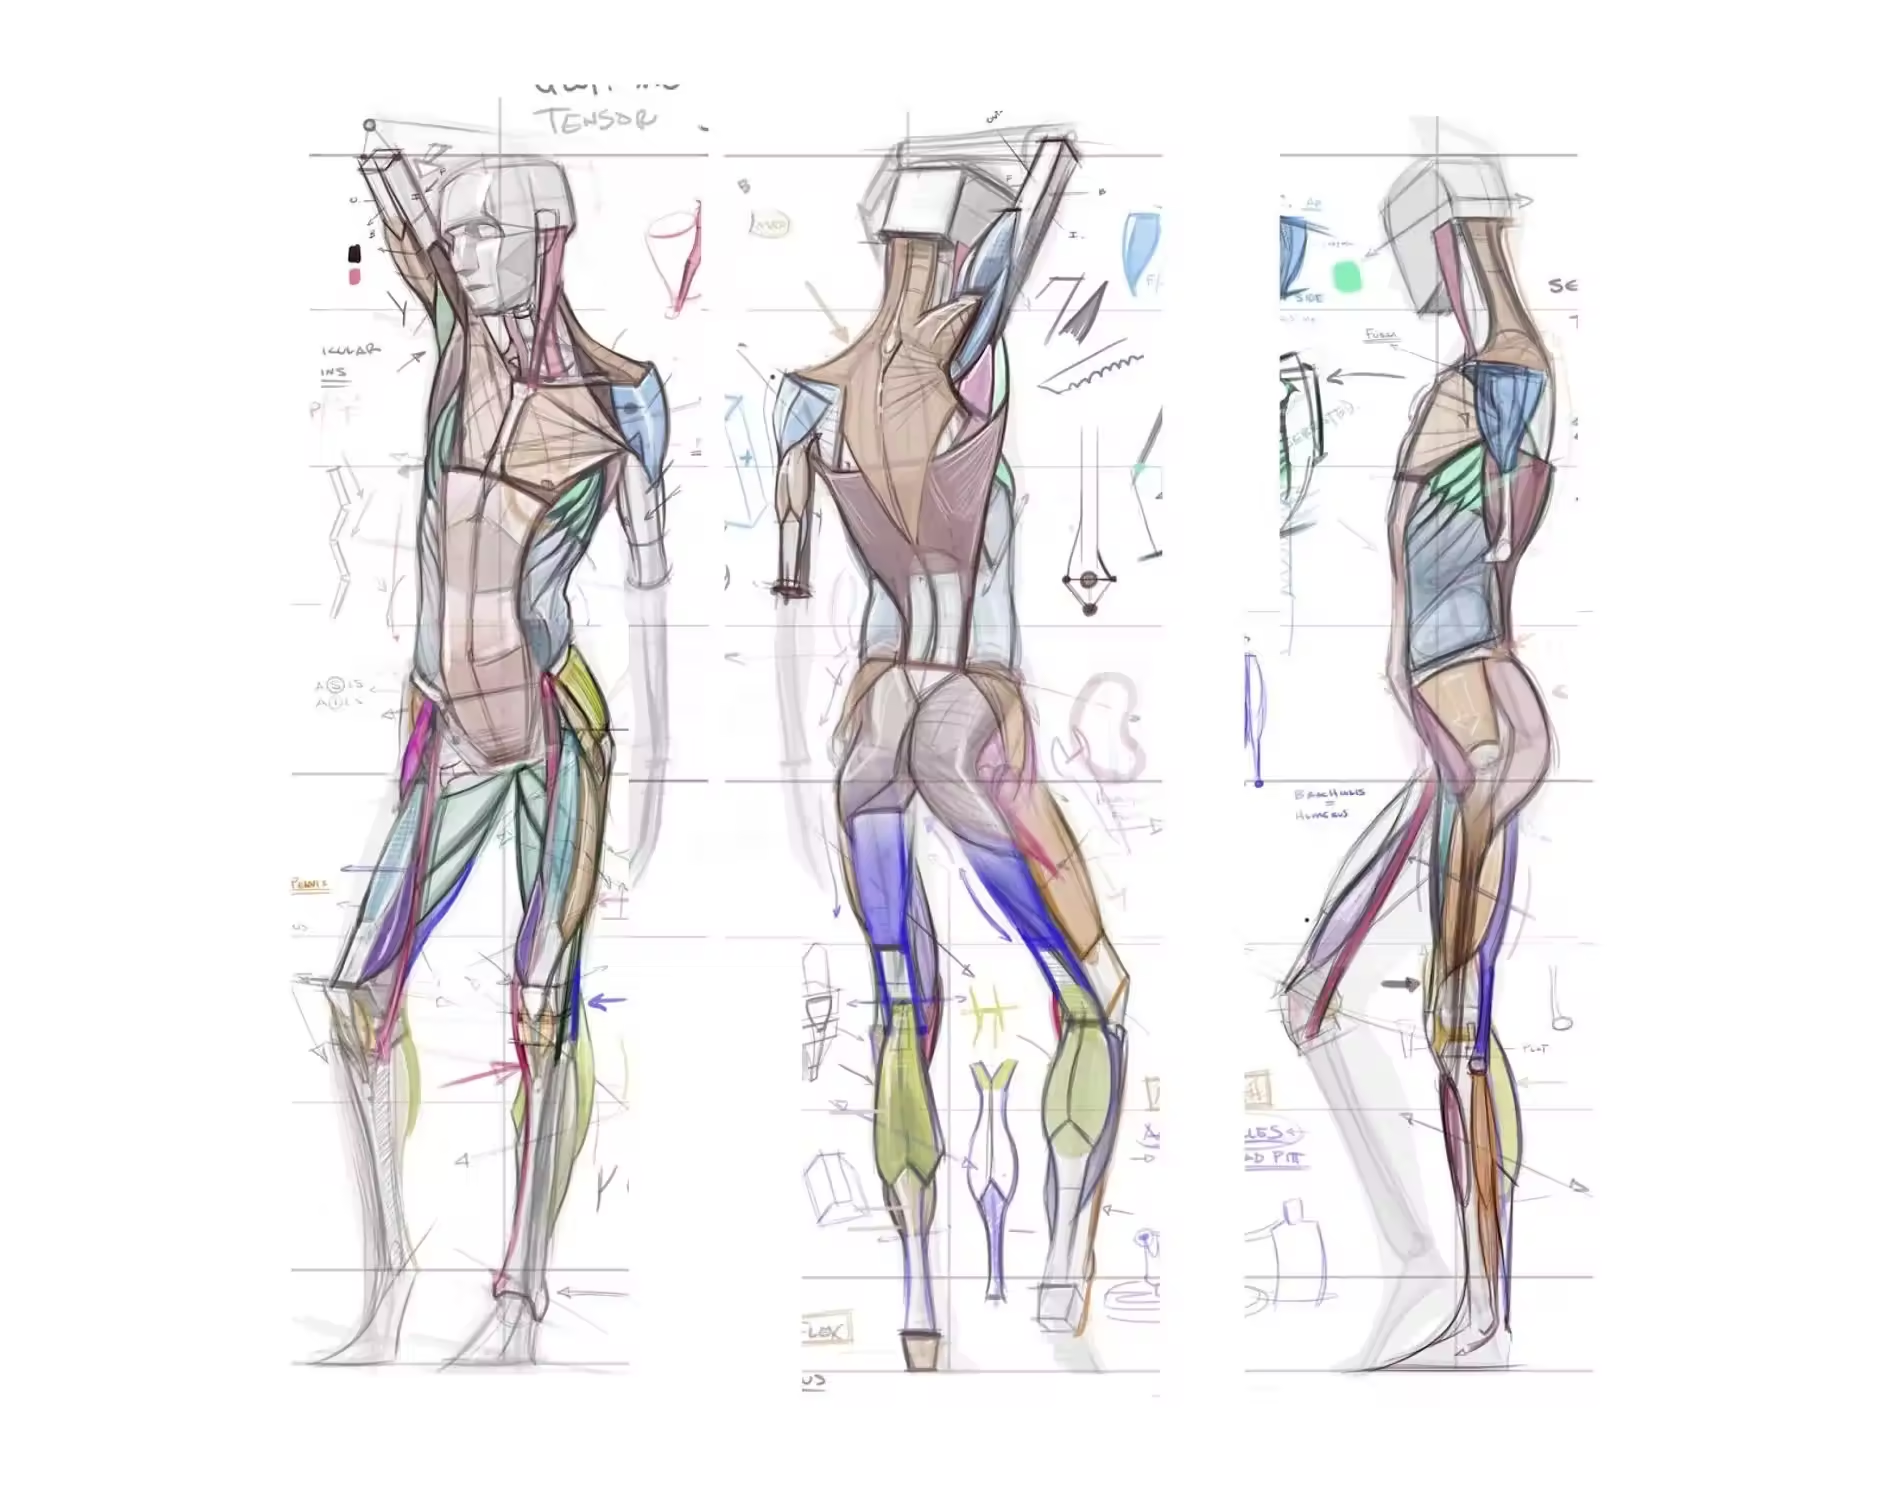
Joints and nodes are another important body of knowledge. Understanding how joints work means understanding why a hand can bend and can lift only to a certain angle — but not higher. Understanding that the knee is several bones, not just one. This knowledge doesn’t limit you — it’s a tool.
Each joint is a “tension node,” where the form changes the most visibly. When the elbow joint bends, it creates a sharp angle and a protruding condyle — if you don’t mark it, the arm looks like a “guts” shape rather than a limb. The kneecap is almost invisible when the leg is straight, but when it’s bent it sticks forward and becomes a structural focal point of the drawing.
George Bridgman, in his “Complete Guide to Drawing from Life,” pays special attention to joints. His approach is to draw the body as a series of “masses” connected by joints. Each mass (forearm, thigh, shin) has its own volumetric shape, and the joint is the point where they interact. This is especially useful for forearms and shins: they aren’t equal cylinders — they’re twisted around their axis, and this twist creates a characteristic silhouette.
A practical tip: when you draw an arm in any pose, first draw three “balls” — the shoulder joint, the elbow, and the wrist. Then connect them with cylinders. It takes 10 seconds, but it gives you a three-dimensional construction.
Body Worlds: the body as discovery
Body Worlds is an exhibition by Gunther von Hagens, where real human bodies are stripped of skin and fixed in various poses. This isn’t horror. It’s the amazing movement of muscles, joints, tissues, and blood vessels. Artists who visit this exhibition often say, “After this, I started seeing movement differently.” Not because they studied anatomy. But because they saw that the body isn’t just a bundle of muscles and bones. A body in motion is balance, effort, tension, and relaxation. That’s exactly what a good body sketch conveys.
Even if you’ve never been to Body Worlds, the effect can be recreated through books on plastic anatomy or through videos. The key is switching from “drawing the outline” to “feeling volume and weight.” Gottfried Bammes, in his monumental “The Complete Guide to Drawing Anatomy,” devoted entire sections to this: he explores how the surface of the body reflects what happens beneath it. A fold of skin on the abdomen isn’t just a line — it’s the result of the pelvis tilting. A protruding shoulder blade isn’t just a detail — it’s the result of a specific movement of the shoulder girdle.
If there’s an exhibition or a museum with anatomical models in your city — go. If not, find high-quality 3D body models (for example, in the SketchFab or Human Anatomy Atlas app). Observe the body in space, not only on a flat surface.
Movement and gesture: how to read a pose
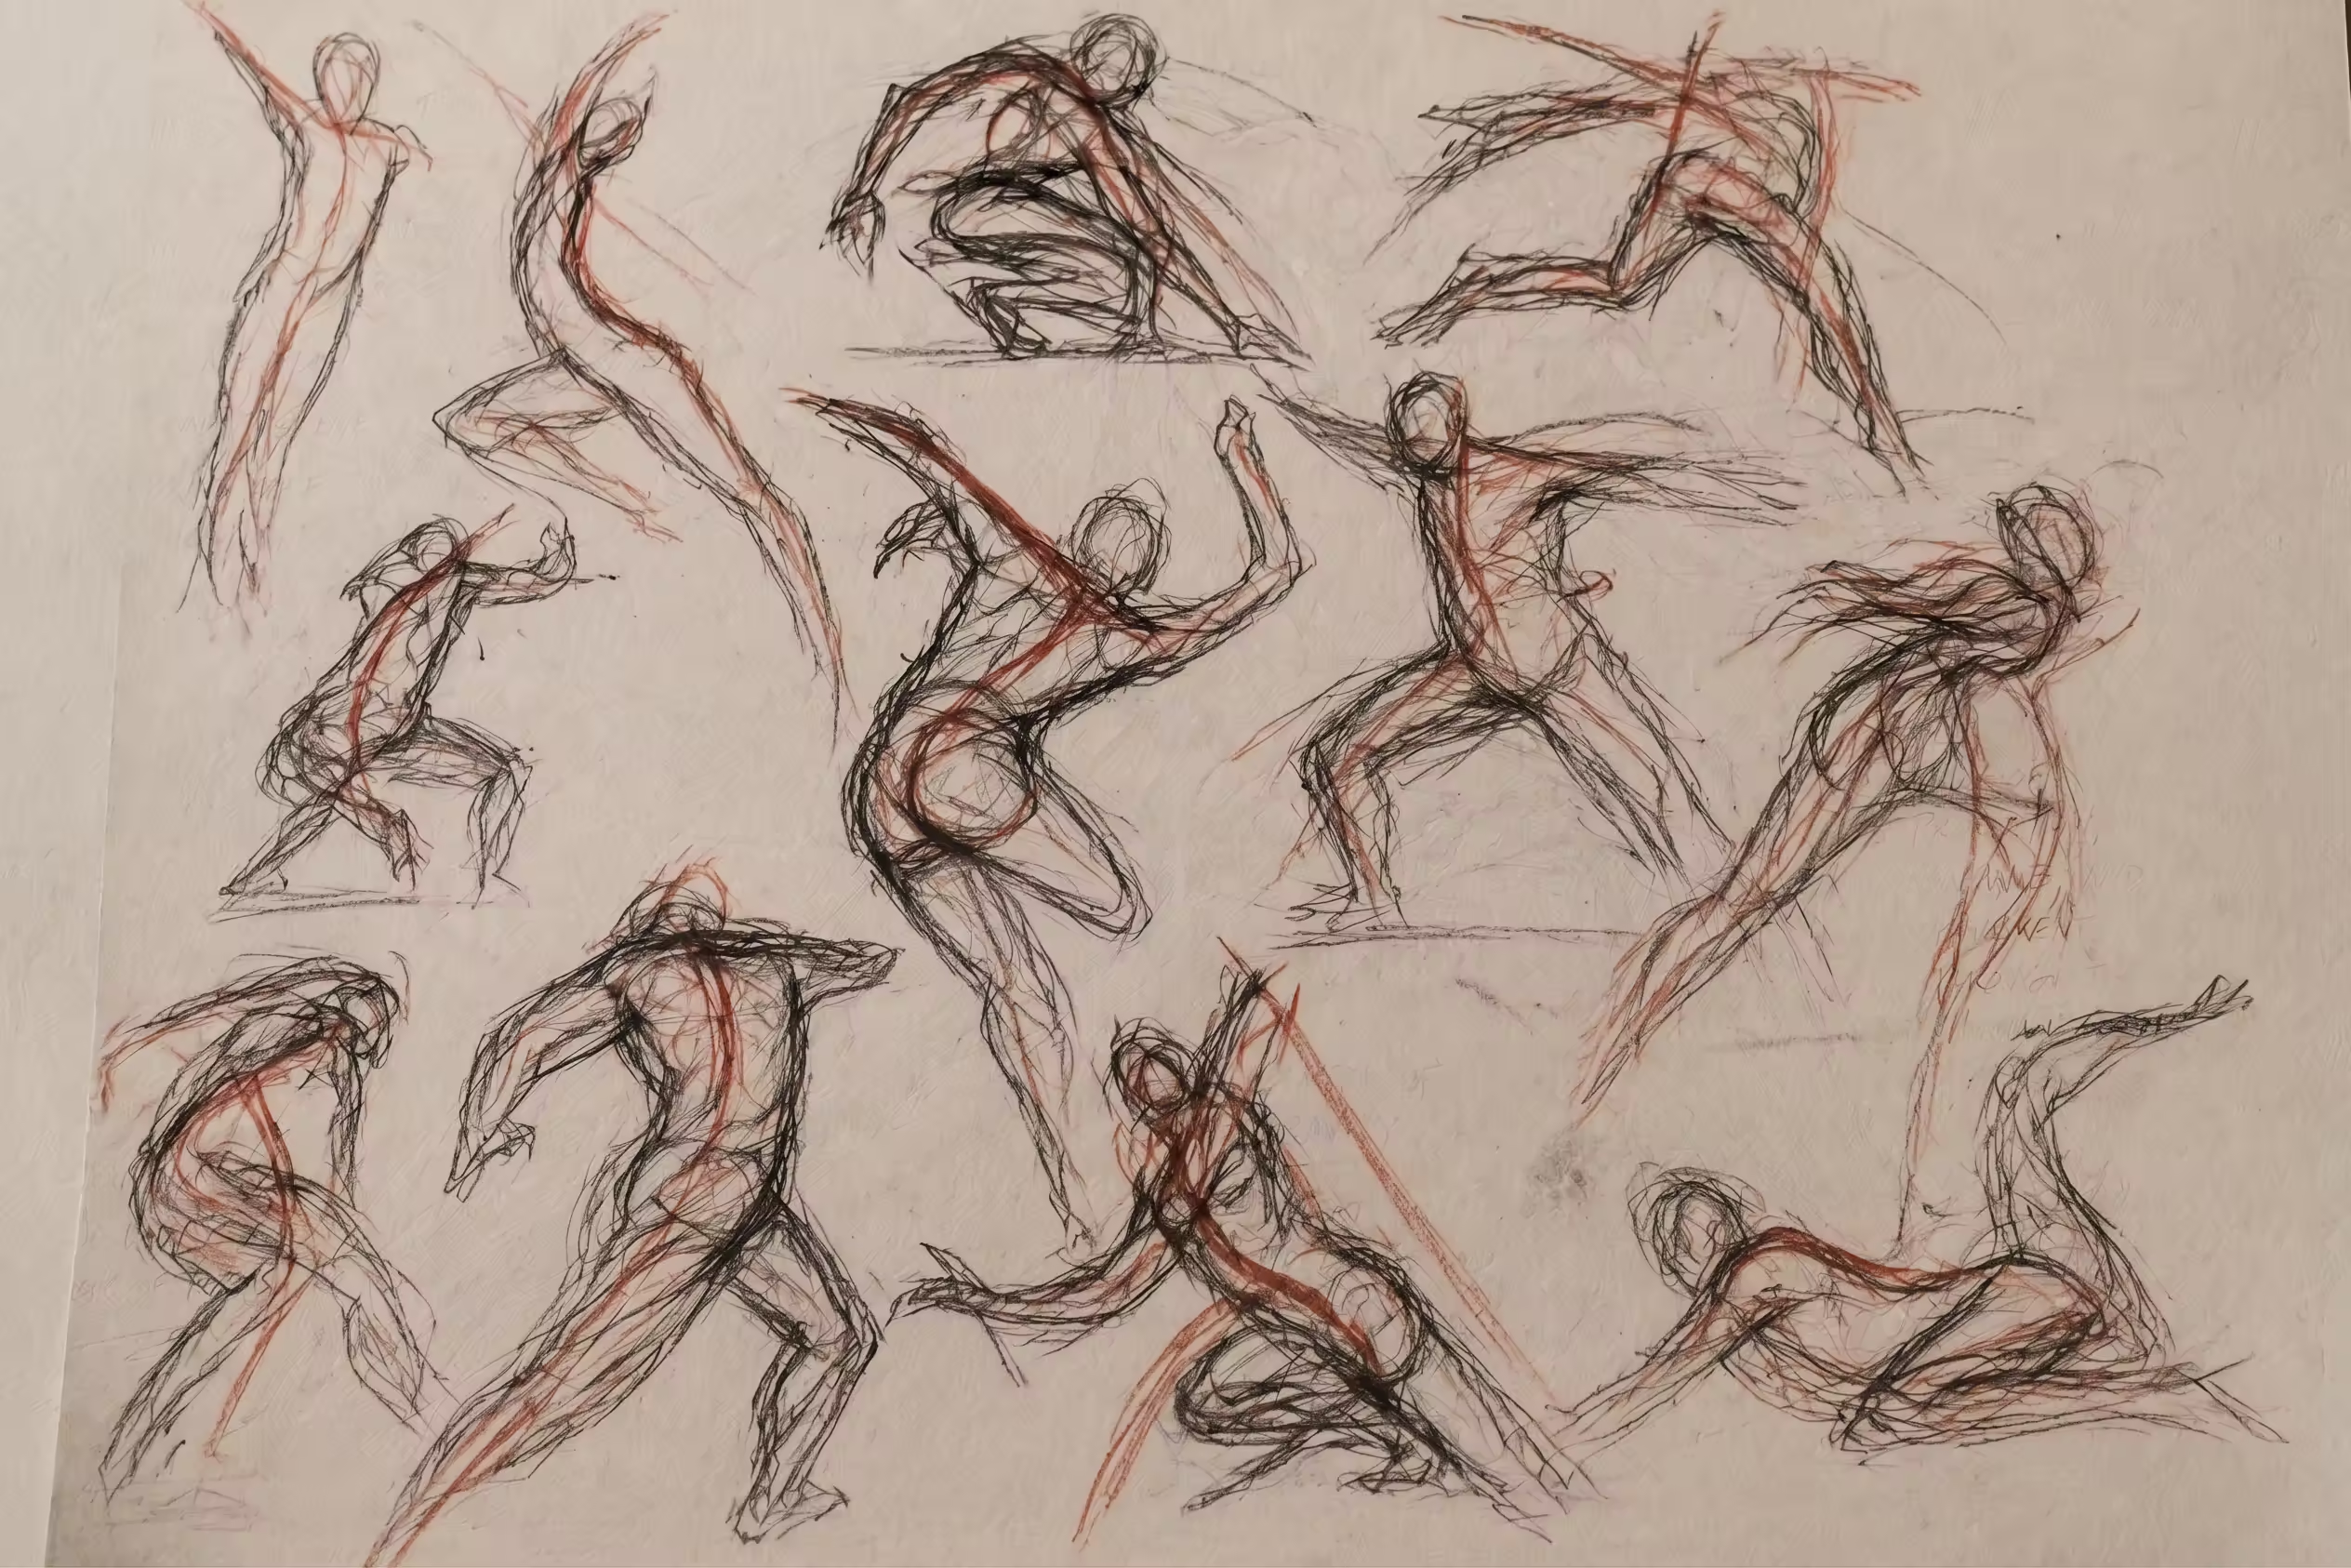
One of the most important lessons body sketching gives you is learning to distinguish gestural drawing from constructive drawing. These are two different approaches, and both are necessary.
Gestural drawing is drawing movement, not form. You don’t think about details; you think about direction, impulse, energy. The gesture drawing line is a curve that shows where the body is “flying.” 30 seconds per pose — and your hand learns to feel the rhythm of human movement.
Constructive drawing is Hampton and Loomis: forms, proportions, joints. You build the body from geometry. It takes 5–15 minutes per pose and teaches you to understand structure.
The ideal practice is to alternate both approaches. Start the session with 10–15 minutes of gesture poses (30–60 seconds each). Then move to 2–3 constructive poses (5–10 minutes each). This balance develops both spontaneity and knowledge.
How to read a pose in seconds
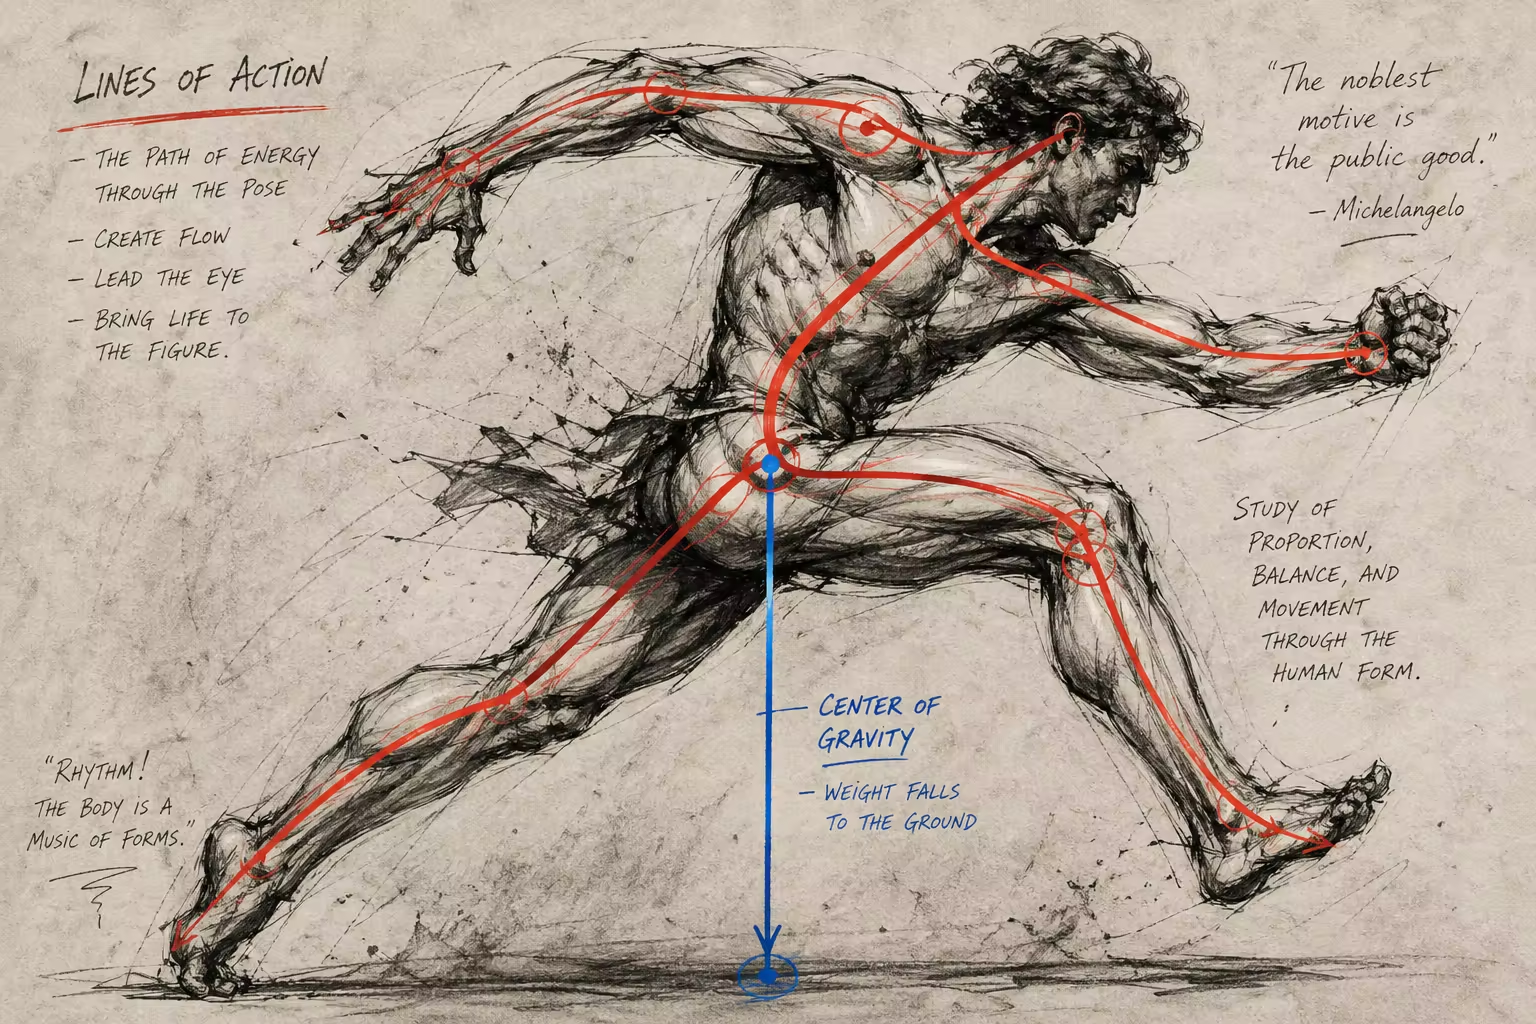
When you look at a person, what movement first “catches the eye”? Usually it’s the spine. The spine is the body’s “line of action.” It can be straight (tension, attention), arched backward (relaxation, confidence), or twisted into an S-curve (dynamics, motion).
The second landmark is the shoulders and the pelvis. They’re almost always tilted in opposite directions: if the left shoulder is higher, then the right side of the pelvis is higher. That’s the natural mechanics of the body in any non-symmetrical pose. If you reflect this tilt in your drawing, the figure immediately becomes alive.
The third landmark is the center of gravity. Imagine a vertical line dropping from the neck to the floor. Where does it land? On one leg? On both? On the floor between the legs (then the person is leaning on something)? This gives you the “physics” of the pose — whether it looks stable, or whether it’s in the process of movement.
Line of Action (line-of-action.com) is the perfect resource for practicing pose reading. Turn on a timer for 30 or 60 seconds and draw: no details, only the line of action, the tilt of the shoulders and pelvis. After a week of this practice, you’ll be able to see the “structure” of any pose in a few seconds.
Books to get started
If you feel ready to start studying systematically, here are a few books worth recommending:
- Andrew Loomis, “Figure Drawing for All It’s Worth” — a fundamental classic of body proportions. Written in 1943, but still indispensable. Loomis explains not just the “how,” but the “why” — why these proportions look harmonious, and how to adapt the canon for different body types. The book is available free online as a PDF.
- Michael Hampton, “Figure Drawing: Design and Invention” — a modern, accessible approach. Hampton explains the body through design thinking: form, construction, dynamics. Great for those who have already drawn a bit and want to systematize their knowledge. Especially useful is the section on the torso box and the rhythm of the spine.
- Bridgman’s “Complete Guide to Drawing from Life” — a detailed atlas of body forms, focused on sculptural “masses.” Bridgman looks at the body “sculpturally” — through volumes and how they interact. It pairs perfectly with learning Hampton.
- Gottfried Bammes, “The Complete Guide to Drawing Anatomy” — a very detailed German classic. If you need depth, this is it. Bammes studies every muscle and explains how it affects the outer contour. Suitable as a “dictionary” for finding specific details.
A tip on using books: don’t read them “from cover to cover.” Open to any page and try to reproduce the drawing beside your own. Compare. Find the difference. Close the book and draw again from memory. That’s how understanding is built — not through passive reading.
Online resources: drawing the body digitally
Line of Action (line-of-action.com) — a convenient service for improvising with Japanese and Western models. You can set a timer: 30, 60 seconds, or 2 minutes. This trains silhouette perception, hand speed, and the ability to pick out what matters without extra details. It’s recommended to do this every day — even 10–15 minutes in the morning gives a noticeable result within 2–3 weeks.
SketchDaily (Reddit) — a community with daily themed tasks. It supports discipline without unnecessary expectations. Nobody judges your level — they only support and comment.
Proko (YouTube) — the best free anatomy course for artists. Prokopenko explains the skeleton, muscles, and proportions in simple language, with humor and plenty of examples. We especially recommend the series “Anatomy of the Human Body for Artists.” By the way, Stan is a Ukrainian who emigrated from Odesa to the USA at age 9.
SculptGL / SketchFab — 3D body models you can rotate in your browser. Very useful when you want to understand how a specific angle looks, but you don’t have a model at hand.
Human Anatomy Atlas (Visible Body) — a paid app, but very high quality. It lets you turn layers on and off (skin, muscles, skeleton) and view the body in motion. For serious study, it’s indispensable.
Practical task: improvisation with the body
Take your sketchbook and do this exercise right now:
- Step 1. Open Line of Action, choose “Figures,” set a 60-second timer. Draw 10 poses in a row. No detail, no face — only the line of action and the silhouette.
- Step 2. Turn off the computer. Draw a person from imagination in three different poses: standing, sitting, walking. Only using geometric forms with Hampton’s method.
- Step 3. Go back to Line of Action and choose one pose for 5 minutes. Draw it constructively: egg-head, two torso blocks, cylinder limbs. Then add details on top of the construction.
Ask yourself after each drawing: which direction is this person veering? Where is the weight? In the shoulder, in the hip, in the bent knee? This is more important than accurately transmitting the form.
And if there’s no model nearby — stand in front of a mirror. Or open your eyes to people in cafés, on the street, on a tram. A body in motion is the best teacher for any sketcher. Indispensable.
Anatomy isn’t about medicine
An artist doesn’t need to know the name of every muscle. They need to feel how these muscles affect the outer form. A hand holding a cupcake isn’t the same as a hand raised upward. Understanding this difference means learning to see a pose as an action, not a set of parts.
Anatomy gives you a language — the language your sketchbook responds with. One page, one pose, one observation. And the next.
Start with Loomis’s proportions, build form with Hampton, and feel the gesture through Line of Action. Don’t try to learn everything at once — just draw regularly, look carefully, and don’t be afraid to make mistakes. The body is the most interesting topic for an artist. And the richest.